A few years ago we published an entire series on bridging in NSX. In the time since, we’ve had a few questions asked about part three of the series, where we discuss methods for frame delivery. In that post, we briefly touch on the ability for a virtual distributed switch in vSphere 6.7 to utilize mac learning in the section ‘Enable MAC Learning (vSphere 6.7+)‘.
While the information provided in that section is correct, utilizing the information provided in William Lam’s blog post presumes that a reader has a base understanding of PowerShell and VMware’s PowerCLI. With this in mind, today we’re going to discuss both of these items, as well as provide a step by step guide to utilize William’s ‘MacLearn.ps1‘ PowerShell module. Our hope is to enable you to more easily consume what William created and successfully enable MAC Learning on a vSphere distributed port group (DVPG).
Note about vSphere 8…
If you’re using vSphere 8, you can enable MAC Learning for a DVPG via the UI in vCenter. On the target DVPG, select ‘Edit Settings‘ and go to the ‘Security‘ section. Here, you can enable MAC Learning by changing its status to ‘Enabled‘, as well as enable Forged transmits by configuring it to ‘Accept‘. Below you can find a screenshot of the ‘Edit Settings‘ screen for a DVPG named ‘Mgmt‘.

Requirements for enabling MAC learning
To utilize MAC Learning, our vSphere environment must be 6.7 or 7. The VDS where the target DVPG resides must be 6.6 or greater.
To utilize the instructions detailed below, there are three components that we must have on the target workstation. These are:
- PowerShell
From Microsoft’s own documentation: “PowerShell is a cross-platform task automation solution made up of a command-line shell, a scripting language, and a configuration management framework”. For our purposes, PowerShell provides us the base shell/environment to create and use modules for making changes to our vSphere environment.
When dealing with PowerShell, you’ll often see the term ‘cmdlet’, which are the commands you may utilize in a PowerShell shell environment directly or a script.
- PowerCLI
PowerCLI is a bundle of PowerShell modules/cmdlets provided by VMware to interface with VMware products such as vSphere or NSX. These cmdlets interface with VMware products via their API. In short, PowerCLI provides a relatively intuitive way to interact with a VMware product’s API without requiring you to write your own code to do so.
You may review the PowerCLI User Guide in its entirety here.
- MacLearn. ps1
‘MacLearn.ps1‘ is a PowerShell/PowerCLI function created by William Lam, and is available from his personal Github here. To read about the function itself, including a deep breakdown of what it is based upon in the vSphere API, please review William’s original post at his site. Many thanks to William for creating and providing this!
Ultimately, PowerShell is our “base”, which allows the creation and execution of scripts and modules. PowerCLI gives us a variety of cmdlets we can utilize to interact with VMware products, all written and leveraging PowerShell in order to function. Lastly, ‘Get-MacLearn.ps1’ is a PowerShell function that leverages existing cmdlets provided by PowerCLI in order to enable MAC learning.
Powershell 5.1 vs Powershell 7.x
You should be aware there are two broadly different versions of “PowerShell”. If you’re using Windows, you will likely find that PowerShell is already installed. This version of PowerShell is known as ‘Windows PowerShell’, and specifically, it’s PowerShell version 5.1.
A few years ago, Microsoft stopped updating ‘Windows PowerShell’, and has now introduced what is simply known as ‘PowerShell’. ‘PowerShell’ (currently in version 7.4) is a cross-platform solution that runs on Windows, Mac OS, and Linux. If you like, you can read about the differences between the two PowerShell types here.
To accomplish our goal today, you technically could use ‘Windows PowerShell’, as it still supports PowerCLI. However, in our experience, ‘Windows PowerShell’, especially if it has never been utilized before on your Windows machine, can be the cause of a lot of heartache. Getting its core components updated and simply installing PowerCLI can be difficult, as you may run into a variety of issues.
In our opinion, even when using Windows, you’re much better off downloading and installing ‘Powershell’ rather than attempting to utilize ‘Windows PowerShell’. It’s of note that, if you are using ‘Windows PowerShell’ for other tasks in your environment today, you can still utilize ‘PowerShell’ as described in this blog with no negative effects. ‘PowerShell’ is designed to run side-by-side with ‘Windows PowerShell’ to avoid any conflicts.
Installing core components
For our example today, we utilized a Windows Server 2016 VM as our workstation, in order to demonstrate the installation and use of ‘PowerShell’ on an OS where ‘Windows PowerShell’ already exists. With that being said, the steps to prepare our environment are:
- Installation of PowerShell 7.4
- Installation of PowerCLI 13.2
- Installation of the ‘Get-MacLearn.ps1’ module
Note: The versions of PowerShell (7.4) and PowerCLI (13.2) we are using are the most current as of this writing. William’s ‘MacLearn.ps1’ module requires at least PowerCLI version 10.1.1, which came out some time ago.
Installing Powershell 7.4
There are several methods available to install PowerShell on the Windows OS. All of the available methods can be found here. We think the easiest method to install PowerShell is downloading and installing via an MSI package, and that is what we did today. While we don’t depict pictures of the install, the default options in the install wizard do not need to be altered if you want to get everything installed quickly.
Note: As an aside, Microsoft recommends using Winget to install PowerShell, as you may find when reviewing all of the available install options. However, Winget doesn’t run on Windows servers, so it wasn’t an option in our lab. Ultimately, you can install PowerShell however you wish.
Once the installation is complete, you can open up a command prompt and run the command ‘pwsh‘. This will place you into the PowerShell shell/environment where you can begin executing cmdlets. You’ll be able to see you are in the PowerShell environment as your command line will now begin with ‘PS‘, which is shown below.

In the above image, we display the PowerShell module path with the execution of ‘$env:PSModulePath‘; this lists all of the locations that PowerShell will look for modules.
Note: This will be the final mention of this, but if you are running Windows, please ensure you enter into the PowerShell environment by executing ‘pwsh‘ in your command line, and not executing ‘powershell‘. Executing ‘powershell‘ will place you in the ‘Windows PowerShell’ environment.
Install PowerCLI 13.2 using PowerShell
Now that we have PowerShell installed successfully, we can install the PowerCLI modules provided by VMware. The simplest way to do this (presuming the OS upon which we are working has access to the Internet) is to execute ‘Install-Module vmware.powercli’. This command instructs PowerShell to look at its defaultrepository (aka the PSGallery) to find the ‘vmware.powercli‘ modules.

In the above image, we have executed the command, but we get a message back that we are using an ‘Untrusted repository‘. You can safely ignore this message for our purposes today; it just means the built in repository hasn’t been configured as trusted. Click the ‘A‘ key to enter ‘Yes to All’. After a few moments, you’ll see the download of the PowerCLI modules begin; below is an example of a running installation of PowerCLI capture so you can know what to expect.

Once the installation is complete, you’ll be returned to the PowerShell command prompt.
Note: In the event that your workstation cannot connect to the Internet directly, instructions to install PowerCLI offline may be found here.
Import the MacLearn.ps1 module
Now that PowerShell and PowerCLI are installed, we need to obtain the MacLearn.ps1 file. If you’re unfamiliar with using Github, when you access the site via the link provided, you’ll be presented with the code of the file itself. In the top right corner of the code, you should find a downward pointing arrow, which you must click to download the file itself. We’ve placed an image with the ‘Download raw file‘ button highlighted below.

Once the module has been downloaded, we will utilize the ‘Unblock-File‘ cmdlet along with the ‘-Path‘ command switch and provide the path to the MacLearn.ps1 file. This instructs PowerShell that this downloaded file is safe for use. Next, the ‘Import-Module‘ cmdlet along with the ‘-Name‘ command switch and the path to MacLearn.ps1 loads the module into PowerShell. Importing the module is what makes the cmdlets within the module (which we will see shortly) available to us. Below is a depiction of these two cmdlets being executed in our PowerShell environment .

Note: For simplicity, we imported the module into PowerShell from the ‘Downloads’ directory, where it was saved when downloading from Github. If your intention is to utilize this function over and over, you’d likely be better served moving the file to a more permanent location. For example, you could utilize one of the directories in the PowerShell PSModulePath, which we showed in the ‘Installing PowerShell 7.4‘ section above.
Note: The effect of ‘Import-Module‘ is session based; if you open a new Command Prompt and execute ‘pwsh‘, the MacLearn.ps1 module must be imported again to utilize its cmdlets. As our expectation is to utilize these cmdlets in a single session today (that is, once we enable MAC Learning successfully, we don’t expect to utilize it again), this shouldn’t be an issue.
If you want to permanently import MacLearn.ps1 (or other downloaded modules in the future), we added a brief discussion on this topic at the bottom of today’s post.
Using the MacLearn.ps1 module
Now that our environment is fully prepared, we can finally enable MAC learning on our target DVPG(s)! Before we get started, here’s an ordered list of the steps that we will follow today.
- Connect to the vCenter where the DVPG resides
- Use Get-MacLearn to see current DVPG configuration
- Use Set-MacLearn to enable Mac Learning and Forged Transmits
- Use Get-MacLearn to verify successful configuration change of DVPG
Let’s take a more in-depth look at each of the above steps.
Connect to target vCenter

Above, we can see that we execute ‘pwsh‘ to enter into the PowerShell environment, and we execute the ‘Connect-VIServer‘ cmdlet with the IP address of our target Center server. Ignoring all the yellow text for a moment, you can see that we are requested to enter credentials to access vCenter (in fact, the yellow text will likely sit on screen for a few seconds before the ‘Specify Credential‘ request appears). After entering our username and password, the data at the bottom will appear demonstrating we are now successfully connected to vCenter. At this point, any PowerCLI cmdlets that interact with vCenter will use this connection.
Back to the yellow text: as this is the first time we’ve used a PowerCLI cmdlet, that block of text in yellow is requesting you to consider participation in the VMware Customer Experience Improvement Program. If you like, you can simply ignore it. As long as you don’t exit the PowerShell environment, all other commands today will not result in this text returning.
Note: If you do exit PowerShell, and then return (say, by closing the command prompt window and opening a new one), then upon using your first PowerCLI cmdlet, you’ll see this text again.
If you think you’ll be using PowerCLI cmdlets more in the future, it would be worthwhile to enter the command presented in the final yellow line (Set-PowerCLIConfiguration -Scope User -ParticipateInCEIP) along with a $true or $false depending on if you wish to participate or not.
Use Get-MacLearn to see current DVPG configuration
Before we make any changes to a DVPG, let’s verify how it is configured. For this, we’ll use the first of the cmdlets provided by MacLearn.ps1, which is ‘Get-MacLearn‘. Using the cmdlet can be done in a few ways, and we demonstrate them below.
In our lab environment, we have two DVPGs named ‘bridge-1‘ and ‘bridge-2‘ for which we wish to enable MAC learning.
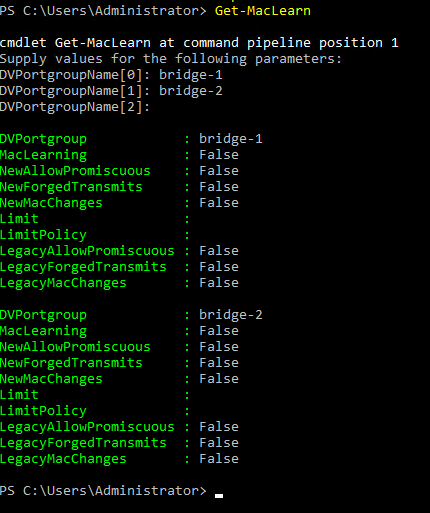
For our first demonstration above, we execute the ‘Get-MacLearn‘ cmdlet with no additional switches. When this is executed, you will be prompted to enter the DVPG name via a ‘DVPortgroupName[0]:‘ prompt. In the above, we enter ‘bridge-1‘, and hit ‘Enter‘. At this time, we are now prompted with ‘DVPortgroupName[1]:‘, and as we have another DVPG we wish to know about, we enter ‘bridge-2‘. After this, you can see we then get a ‘DVPortgroupName[2]:‘ prompt. As we have no other DVPGs to query, we just hit ‘Enter‘ to move on.
In the same image above, you can see the output of ‘Get-MacLearn‘ for each DVPG. For our purposes today, note that ‘MacLearning‘ along with ‘NewForgedTransmits‘ and ‘LegacyForgedTransmits‘ are all set to ‘False‘. This, of course, means that MAC learning and Forged transmits are disabled.
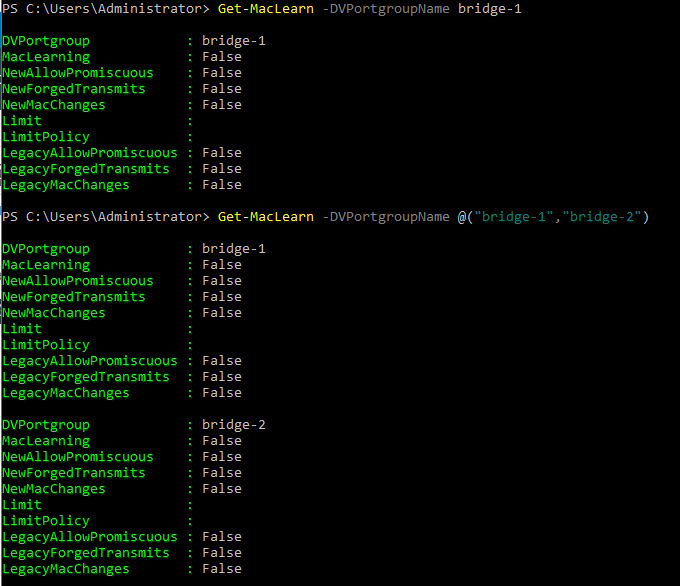
Just for additional demonstration purposes, above you can see a few other ways to utilize the ‘Get-MacLearn‘ cmdlet. In the first example, we add the ‘-DVPortgroupName‘ command switch and the name of a target DVPG (‘bridge-1‘). In the second, we do the same thing, but we give the command an array of DVPGs (‘bridge-1‘ and ‘bridge-2‘) to query. Note that when using an array, we must prepend our info with the ‘@‘ symbol, and encompass the entire request in parentheses. Also, this method requires each DVPG name to be encompassed in quotes, and separated by a comma.
Use Set-MacLearn to enable Mac Learning and Forged Transmits
Now that we’ve confirmed the status of our target DVPGs, we’ll use the second cmdlet provided by MacLearn.ps1, which is ‘Set-MacLearn‘. Utilizing ‘Set-MacLearn‘ requires us to specifically enable or disable ‘EnableMacLearn‘, ‘EnablePromiscuous‘, ‘EnableForgedTransmit‘ and ‘EnableMacChange‘ by assigning a ‘$true‘ or ‘$false‘ value.
In our first example below, we configure the ‘bridge-1‘ DVPG to enable MAC learning and Forged transmits by setting ‘EnableMacLearn‘ and ‘EnableForgedTransmit‘ to ‘$true’. We configure the remaining two options (‘EnablePromiscuous‘ and ‘EnableMacChange‘) to false, as these are not required for bridging with MAC learning. You may click on the below image to see it more clearly.

In our second example, we are applying the exact same configuration settings except we are issuing it to both ‘bridge-1‘ and ‘bridge-2‘ DVPGs at the same time. As discussed in the ‘Get-MacLearn‘ section above, we are providing ‘Set-MacLearn‘ an array of DVPG names, so the same rules apply (using ‘@‘ symbol, parenthesis, quotations, comma, etc). You can click on the below image to expand it for review if so desired.

Regardless of how you use ‘Set-MacLearn‘, you’ll see upon execution you will get a message about ‘Enabling MAC learning on DVPortgroup <DVPG name> …’. Once the command is successfully executed, you’re simply returned to the PowerShell prompt.
Use Get-MacLearn to verify successful configuration change of DVPG
In order to verify that ‘Set-MacLearn‘ did everything we wish, let’s utilize ‘Get-MacLearn‘ one more time, as we did previously. You can see in the below that we are querying an array of DVPGs, and our results demonstrate that ‘MacLearning‘, ‘NewForgedTransmits‘, and ‘LegacyForgedTransmits‘ are all set to ‘True‘ for each of our DVPGs.

That’s it! MAC learning has been successfully enabled on our target DVPGs, and with Forged transmits enabled, we are ready to utilize bridging in NSX!
We hope this is of use to anyone who wishes to utilize MAC Learning on a DVPG in vSphere 6.7 or 7. See you later!
Bonus: Using a PowerShell profile to import MacLearn.ps1
While there’s a variety of ways one could permanently load MacLearn.ps1 into a PowerShell environment, we wanted to at least give you one simple way to accomplish this.
Before we get started with this, there are two things you should do:
- Place the MacLearn.ps1 file in a sensible location (so you can always locate it)
- Use the ‘Unblock-File‘ cmdlet as shown in the Using the MacLearn.ps1 module section
‘Unblock-File‘ only needs to be used once. After it’s been utilized, you can safely import MacLearn.ps1 at any time.
The first thing we need to do is to create or edit your profile in PowerShell. Microsoft has a great breakdown on performing this, including an ‘if‘ statement that will check for the existence of a profile, and create one if it does not exist. An image of us using this ‘if‘ statement to create our PowerShell profile is below.

As we are performing our work today on a Windows OS, we can edit our new profile by issuing the ‘notepad $PROFILE‘ command from our PowerShell environment. This will open up your PowerShell profile in Notepad. If the profile was just created by the previous ‘if‘ statement, it will be a blank document.
To import the MacLearn.ps1 module each time we use PowerShell, add the following line to your profile:
Import-Module -Name <file path>
So, if MacLearn.ps1 was in C:\Users\Administrator\Documents\PowerShell\Modules, the line in your profile would be:
Import-Module -Name C:\Users\Administrator\Documents\PowerShell\Modules\MacLearn.ps1
Now you can save and close Notepad. From this point on, any time you enter your PowerShell environment, the cmdlets from MacLearn.ps1 will be available to you. To test, close your existing PowerShell environment and open a new one.
