*********UPDATE*********
Shortly before this post went public, VMware announced the availability of a public Harbor repository for the purposes of deploying NAPP. The Helm Repository and Docker registry URLs are:
- Helm Repository: https://projects.registry.vmware.com/chartrepo/nsx_application_platform
- Docker Registry: projects.registry.vmware.com/nsx_application_platform/clustering
As long as your environment can reach the above URLs (and, obviously, as long as it’s allowed by your internal security posture), you won’t need to deploy your own Harbor instance; you’ll simply point your NSX-T manager at these URLs when deploying NAPP.
The advantage to you is two fold: 1) You will not need to stand up your own Harbor repository and 2) you will not need to download the NAPP components tgz file, as you’ll be fetching these components directly from the VMware Harbor repository during your NAPP installation.
If you cannot or will not utilize these public offerings, then you will need your own Harbor repository. For that information, please read on…
********************************
Continuing with our ‘Deploying NSX Application Platform’ series, we’ll focus on a required component of successfully deploying NSX Application Platform (NAPP): the Harbor repository.
What is Harbor?
At it’s most basic, Harbor is a repository where you can upload and download container images and Helm charts. While Harbor can certainly do much more than that, for the purposes of deploying NAPP, a Harbor repository hosts the NAPP Helm charts and Docker images.
Harbor, Certificates, and your NSX-T/NAPP deployment
The NSX-T manager and K8s workload nodes communicate with Harbor via HTTPS; as such, Harbor will present a SSL/TLS certificate. As with any HTTPS communication, the expectation is that the client communicating with the Harbor server will be able to validate that the certificate has been signed by a known certificate authority(CA).
Today’s browsers and operating systems come with a list of trusted Root (and some intermediate) CAs; this is how you can go to a public website and validate the certificate presented by the server. You can read a bit about the process of certificate validation here if you’d like a refresher.
If the site has a self-signed certificate, or if it’s signed by an unknown root or intermediate CA, the browser will inform you that the site’s certificate cannot be validated, and will flag this as a potential security risk. Most of the time, the choice will now be up to you to ignore this message (if you need to continue) and potentially elect to add the site’s certificate to your personal trusted certificate list.
Since both our NSX-T manager and our K8s workload nodes will need to communicate with Harbor via HTTPS, they must be able to ensure the certificate being presented by the Harbor server is valid. The process of doing so is the same as mentioned above: the operating system’s built-in list of CAs is utilized to validate the Harbor server’s certificate.
A key difference when our NSX-T manager or K8s nodes attempt to communicate with an HTTPS site vs when a user does so via a browser is that with the former, there is no capability for us to interactively accept a certificate that is self-signed/signed by an unknown CA. Either the certificate presented can be validated by the CAs known to the OS of the NSX-T manager / K8s workload nodes, or the communication will fail due to an ‘x509: certificate signed by unknown authority‘ error.
Typically, the solution is to import the certificate in question and/or the CA certificate that signed it into the operating system of device trying to communicate with the server. While that is certainly a possibility for our k8s worker nodes (for instance, here is how you could accomplish this via VMware Tanzu 1.4), as of this writing there is no officially supported way to import these certificates for the NSX-T manager.
As the NSX-T manager is based on Linux, you may have the thought to insert the certificates into the operating system manually via root access. While that is certainly possible, please note there is no officially supported way to do so. We never want to recommend a solution that would potentially result in a refusal of support from VMware.
For today, the only officially supported option is utilizing a publicly CA signed certificate for your Harbor instance. For many lab environments (including our own), a certificate provided by Let’s Encrypt is utilized to meet this need.
Deploying your Harbor repository
To begin, there are functionally two ways to install a Harbor instance:
1. – Installing a containerized version of Harbor in your K8s environment or
2. – Installing Harbor directly on a virtual machine.
Since the entire presumption of this series is that you do not have an existing K8s environment, we felt it made more sense to go the route of installing Harbor on a virtual machine. Installation steps for Harbor are on the goharbor.io website and you may click here to see the installation instructions for the 2.4.x version of Harbor.
Harbor Prerequisites
Before we move forward with the Harbor installation, let’s take a look at what is first required for deployment:
- A Linux virtual machine to host the Harbor application
- A CA signed certificate (discussed above)
- A DNS entry for the FQDN of the certificate that resolves to the IP address of your Ubuntu Server
You may take a look at the Harbor prerequisites here, and they’re fairly low key; for the recommended settings, you’ll require a virtual machine with 4 vCPU, 8 GB of memory, and 160 GB of storage. As the OS just needs to be Linux based, we elected to go with Ubuntu Server 21.10.
To begin, we created the VM in vSphere, attached the Ubuntu Server 21.10 ISO, and performed a basic install of the OS. We recommend enabling SSH access to the server to make managing things a bit easier. Aside from that, if using Ubuntu Server as your base, you won’t need to add any software/snaps during installation; simply get Ubuntu Server installed.
Once your Ubuntu Server is up and available, we will need some additional software in order to utilize Harbor. Specifically, you’ll need to install docker engine and docker compose. OpenSSL is also a requirement for Harbor but it’s already installed on the base Ubuntu Server image (OpenSSL 1.1.11).
Lastly, part of the Harbor installation requires you to store your certificates in the /data/cert and the /etc/docker/certs.d/<FQDN> directories. As these do not exist by default (/etc/docker does, but not the certs.d/<FQDN> sub-directories), you’ll need to create them. For Ubuntu Server:
- ‘sudo mkdir -p /data/cert‘ will create both the /data directory as well as the /data/cert sub-directory
- ‘sudo mkdir -p /etc/docker/certs.d/<FQDN>’ will create the required sub-directory under /etc/docker (ex. ‘sudo mkdir -p /etc/docker/certs/d/harbor.myhomevlab.com)
Harbor Installation
Now that we have our Ubuntu Server prepared, we can reference the Harbor installation instructions directly. Using the published documentation as our guideline, below is what we recommend for an installation. Each step below includes a link to the relevant portion of the Harbor install documentation:
- Download the Harbor Installer – As long as your Ubuntu Server has Internet access, we’d suggest utilizing the online installer method; however, the offline installer works perfectly fine.
- Configure HTTPS Access to Harbor – As you should already have your CA signed certificate, skip the first two sections of this page and go down to the ‘Provide the Certificates to Harbor and Docker‘ section (if you click the link provided for Step 2 here, it will take you straight to this section). Complete the steps in this section only (that is, stop when you reach the ‘Deploy or Reconfigure Harbor‘ section).
- Configure the Harbor YML File – In the directory where the Harbor installer was unzipped, you’ll find a ‘harbor.yml.tmpl‘ file. To get started, make a copy of this file named ‘harbor.yml‘, and edit this file using your preferred editor. Inside ‘harbor.yml‘, you will find many elements that may be configured; however , there are only a few that you must change, and you can leave the rest to default. In order, these elements are :
- hostname: Enter the FQDN for your harbor deployment here
- https: Here you will find two sub-elements you need to configure which are:
- certificate: Enter the path to where the harbor.cert file is located (should be /data/cert/filename.cert if you are following the directions from Step 2 above)
- private_key: Enter the path to where the harbor.key file is located (should be /data/cert/filename.key if you are following the directions from Step 2 above)
- <optional> harbor_admin_password: this element sets the admin initial admin password; the default entry here is ‘Harbor12345‘. (You can always change the Harbor admin password once it’s up and running if you like).
- <optional> database: Find the sub-element here called ‘password‘. This entry sets the password for the root user of Harbor DB. It’s recommended by the Harbor team to change this from it’s default (which is ‘root123‘) before deploying Harbor in production.
- Run the Installer Script – Finally, you will run the installer script in the directory where Harbor was downloaded. The file itself is ‘install.sh‘ but you must run the script with the ‘ –with-chartmuseum‘ parameter appended, as this is required to enable Harbor to host Helm charts. To run this on an Ubuntu server, you will execute:
sudo ./install.sh --with-chartmuseum
Once you run the ‘install.sh‘ script, the docker images that comprise Harbor are pulled down to your Ubuntu Server (this presumes you are following the online install mentioned in Step 1). Once the images are down, the script leverages docker-compose to provision all of the necessary containers.
Here’s a screenshot of the ‘install.sh‘ script wrapping up; you can see where some images have been pulled down, and then the docker containers being created. The script concludes with a message informing you that Harbor has been installed and started successfully.

Now that Harbor is successfully up and going, we can verify by connecting to the Harbor repository via a web browser over HTTPS:
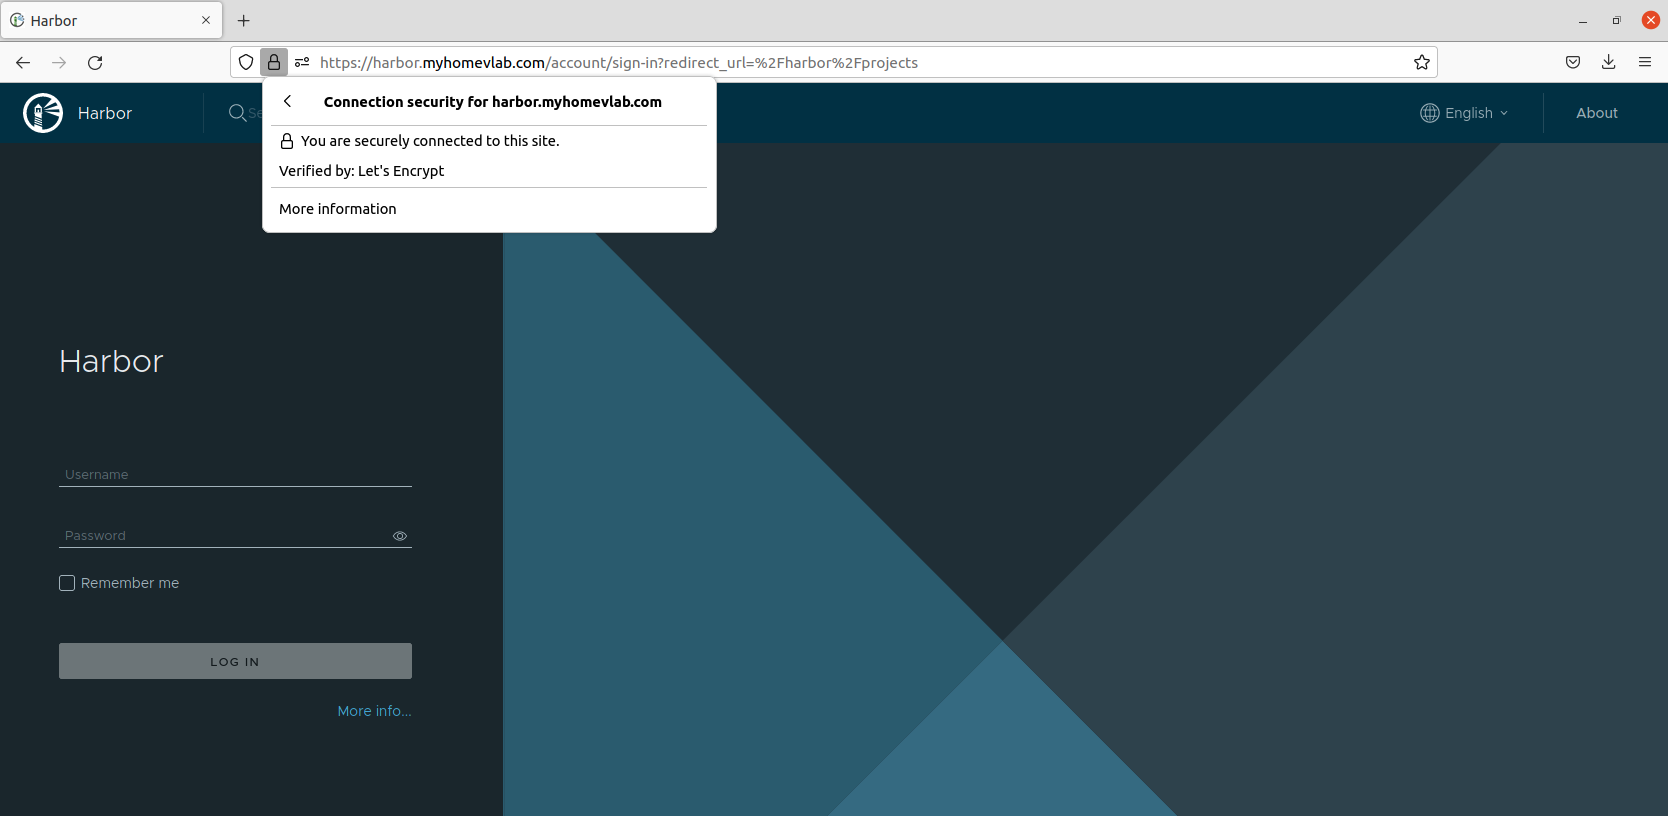
In the above screenshot, you can see we successfully reach the Harbor instance via it’s FQDN; since we are using a CA signed certificate for Harbor, we get no security warning, and our browser trusts the certificate that has been provided. We’ve elected to also show the security description provided by the browser; you can see the certificate for ‘harbor.myhomevlab.com‘ has been signed by Let’s Encrypt.
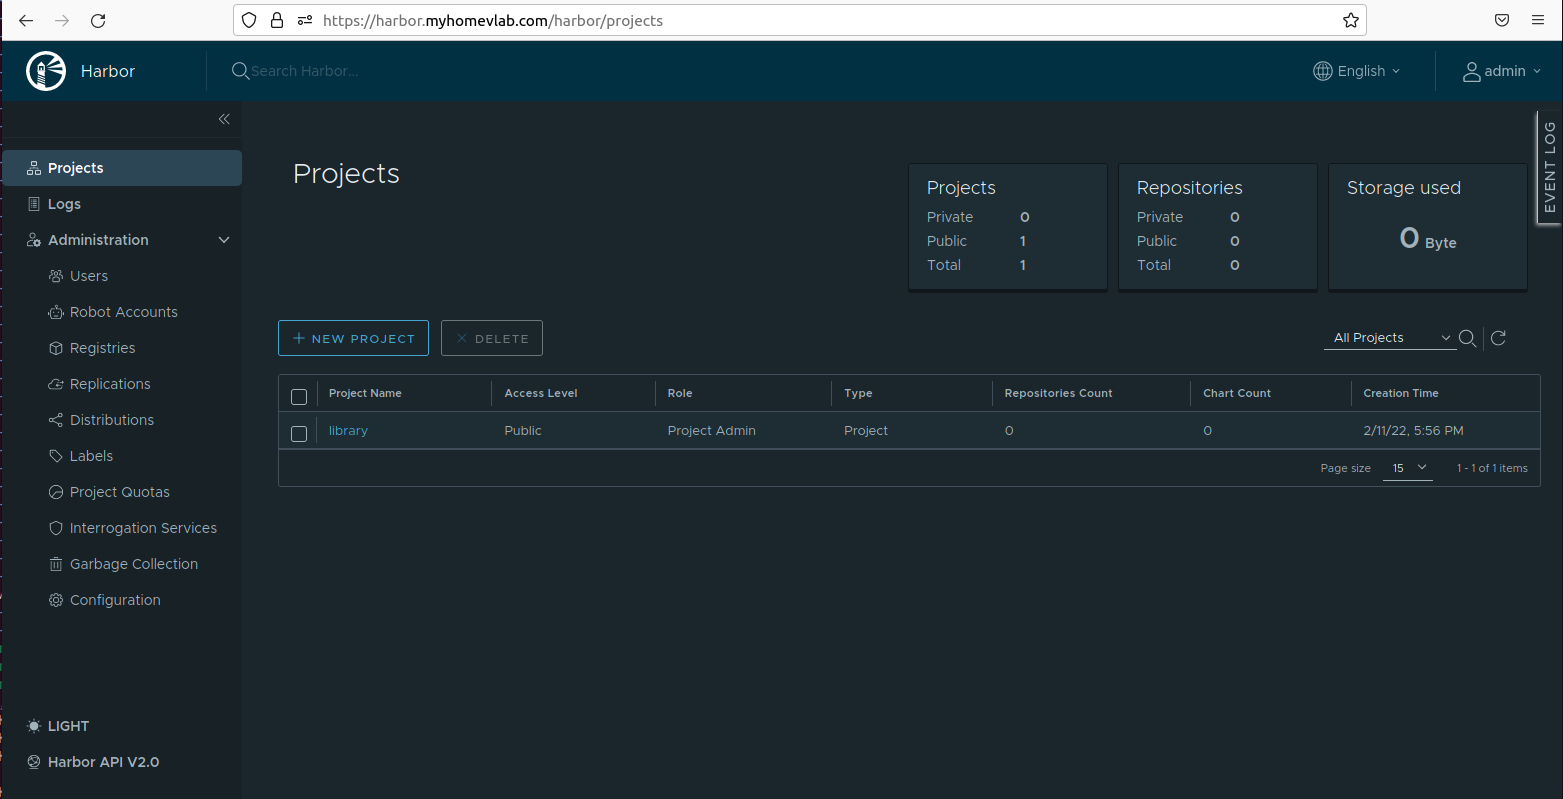
Create a Harbor project for NAPP
Before we close out, let’s go ahead and create a project inside Harbor which will eventually host the NAPP containers and helm charts. Go ahead and login to Harbor via the web interface. Once inside, you will find yourself in the Projects section of Harbor.
Click the ‘New Project’ button, which will result in you being prompted with the ‘New Project’ window, like the one below:
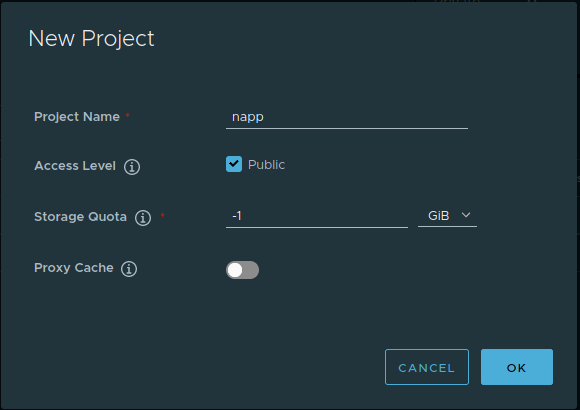
Here you can see we’ve entered a name of ‘napp‘; any name will suffice, but you’ll need the project name later when it’s time to upload NAPP components to Harbor. We also elected to mark the project as ‘Public’, which allows anyone to download the components hosted by the project. You may leave the other options at their default. Hit the ‘OK‘ button to create this project.
Once created, you will see your project listed in the available list.
One last thing….
The first time we deployed Harbor in our labs, we failed to utilize the ‘–with chartmuseum‘ parameter when running the .install.sh script. If you fail to add this parameter, what you’ll end up with is an installation of Harbor that does not support Helm charts. An easy way to verify this is to open up the project you just created by clicking on it’s name from the project list.
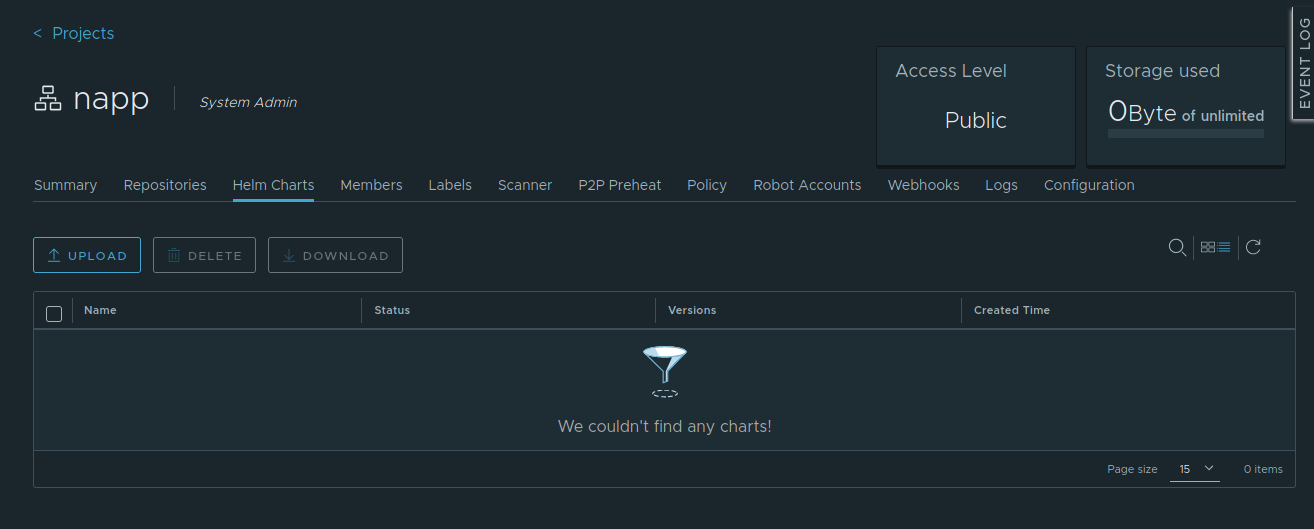
If you’ve deployed Harbor properly with the ‘–with chart-museum‘ parameter, you will have a ‘Helm Charts’ tab/field in the list of menu items inside the project. As seen above, beginning from the left, we have ‘Summary‘, ‘Repositories‘, and then ‘Helm Charts‘.
If you do not see a ‘Helm Charts‘ entry inside your project, this likely means that Harbor was not deployed utilizing the ‘–with chart-museum‘ parameter, and in it’s existing state, won’t work for you as an NAPP repository. The simplest (but not the only) way to correct this is to just re-run your Harbor installation.
Wrap Up
We covered a lot here today, but to recap:
- We discussed what Harbor is
- A breakdown of the importance of a CA signed certificate, and why it’s a must
- Instructions/Guidelines to getting a Harbor deployment up quickly and smoothly for your future NAPP deployment
In our next post, we’ll discuss the Kubernetes platform we’ve chosen for your NAPP deployment. See you soon!
