Today we’re beginning a new series on route filtering in NSX. Before we dive into our first topic (‘IP Prefix Lists for Route Filtering‘), let’s take a look at “route filtering” and how it’s utilized within NSX.
Route Filtering
Route filtering is a mechanism to alter the routes that are learned or advertised via a routing protocol; in the case of NSX, this would be BGP or OSPF. When considering route filtering in NSX, we believe it can be broken down into two basic use cases: a “simple” use case and a more “advanced” use case. We would define each of these as:
- Simple – Deterministically allow or deny network prefixes from being learned or advertised via ‘IP Prefix Lists‘
- Advanced – Deterministically alter BGP attributes of learned or advertised network prefixes via ‘Route Maps‘
You may notice the ‘Advanced‘ use case explicitly mentions BGP attributes. This is because the use of ‘Route Maps‘ in NSX is primarily designed to support the BGP protocol. However, there is a use case for NSX Route Maps with OSPF (Route Re-distribution) discussed below.
Route filtering in NSX is configured in one of four different places:
- an “In” Filter – this allows the filtering of routes learned from a BGP peer, i.e., inbound filtering
- an “Out” Filter – this allows the filtering of routes before they are advertised to a BGP peer, i.e., outbound filtering
- Within the Route Re-distribution configuration of a Tier-0 – this is the filtering of routes before they’re distributed into the local Tier-0 BGP or OSPF process
- NSX 4.1.1 introduced a feature for route filtering between NSX Projects (this new feature is a little outside of our discussion today; for now, let’s ignore it and we can come back to it in a future post)
To clarify the data points above further in regards to routing protocols:

- “In” and “Out” filtering is exclusive to BGP neighbors in NSX and may be performed using IP Prefix Lists directly or Route Maps.
- Route Re-distribution filtering is applicable to both OSPF and BGP. Filtering in this fashion may only use Route Maps.
- Above we noted Route Maps are used to deterministically alter BGP attributes. While this is true, when used for OSPF Route Re-distribution, there are no BGP attributes to alter; the route map is simply allowing or denying the contents of any associated IP Prefix List for the purposes of filtering routes being re-distributed into OSPF.
As the topic is ‘IP Prefix Lists for Route Filtering‘, let’s examine how IP Prefix Lists can be used directly as either “In” or “Out” filters for BGP neighbors.
Note: We’re using NSX 4.1.2.4 for this series, but most everything we discuss should be applicable to any version of NSX (formerly NSX-T) from 3.x onwards; we’ll work to identify any features that are exclusive to a given version of NSX.
IP Prefix Lists
An IP Prefix List is basically an Access Control List (ACL) for route advertisements and is made up of a series of entries. Each entry in an IP Prefix List contains the following:
- Network – This is the IP network itself in CIDR notation (aka network prefix) – for instance, ‘172.20.20.0/24‘
- ge – This is the ‘Greater Than or Equal To‘ field [this field is optional]
- le – This is the ‘Less Than or Equal To‘ field [this field is optional]
- Action – this is comprised of a drop down, where you may choose ‘Permit‘ or ‘Deny‘
Utilizing the above data, we can determine if a given network prefix is permitted to be learned (via inbound filtering) or advertised (via outbound filtering) using BGP. Much like you’d think of a firewall policy, a learned or advertised network prefix is compared to each entry in an IP Prefix List, starting with the first, and descending to the bottom until there is a match.
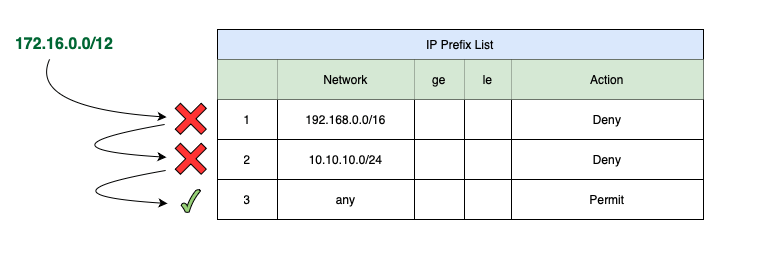
In the above example, we can see the network prefix of ‘172.16.0.0/12‘ compared to the entries of an IP Prefix List. As ‘172.16.0.0/12‘ doesn’t match the first line’s network of ‘192.168.0.0/16‘, it moves on to be compared to the next entry of ‘10.10.10.0/24‘. As this also doesn’t match, the network prefix moves on to the third entry, which is configured with a network of ‘any‘. This entry does match our network prefix, as ‘any‘ matches anything and everything.
Since the matching item contains a ‘Permit‘ action, the ‘172.16.0.0/12‘ network prefix is allowed to be advertised or learned. If the ‘172.16.0.0/12‘ had happened to match a ‘Deny‘ action, then the network prefix would be filtered, and would not be advertised or learned.
Building our Prefix List

Above we can see the topology we’ll be using for today’s discussion. As depicted, we have 3 networks attached to a Tier-1 (T1), which in turn is connected to our Tier-0 (T0). The T0 Service Router (SR) shown is configured with the following:
- T0 is configured to use BGP with an AS of ‘100‘
- T0 is configured via ‘Route Re-distribution‘ to redistribute ‘Connected Interfaces & Segments‘ under ‘Advertised Tier-1 Subnets‘ into BGP (note: the T1 must also be configured to advertise ‘All Connected Segments & Service Ports‘ as well)
- A ‘172.16.60.10/24‘ addressed External Interface, which is eBGP peered with the ‘TOR Left‘ SVI of ‘172.16.60.1/24‘ on VLAN ‘60‘.
- A ‘172.16.70.10/24‘ addressed External Interface, which is eBGP peered with the ‘TOR Right‘ SVI of ‘172.16.70.1/24‘ on VLAN ‘70‘.
- ‘TOR Left‘ and ‘TOR Right‘ are each using AS ‘200‘.
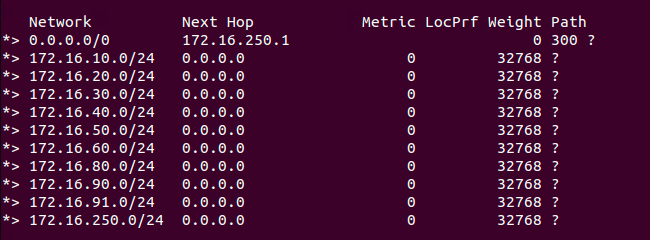
Before we make any changes, let’s look at a snippet of the BGP table on ‘TOR Left‘:
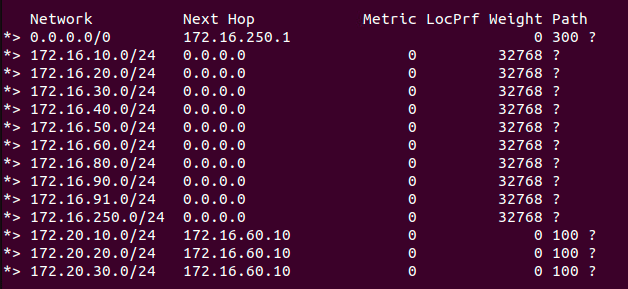
If we bring our attention to the bottom of the list, we see the three T1 networks have been learned on ‘TOR Left‘ with a next hop of ‘172.16.60.10‘ (the External interface of the T0 on VLAN ‘60‘). You can also see the ‘Path‘ column for each of the three entries at the bottom displays ‘100‘; this is the AS number assigned to the T0.
Let’s say we no longer wish to advertise the ‘App‘ network (‘172.20.20.0/24‘) to the outside world. To accomplish this, we create a single IP Prefix List named ‘Deny App Network‘ on the T0 Under ‘Networking -> Tier-0 Gateways -> <expand target T0> -> Routing -> IP Prefix Lists’.

Above you can see we created in the ‘Deny App Network‘ IP Prefix List and it has a single entry: In the ‘Network‘ column, we have entered the ‘App‘ segment’s associated subnet, which is ‘172.20.20.0/24‘, and we’ve chosen the ‘Deny‘ option from the ‘Action‘ dropdown list. We don’t need to enter anything under ‘ge‘ or ‘le‘ for our purposes here.
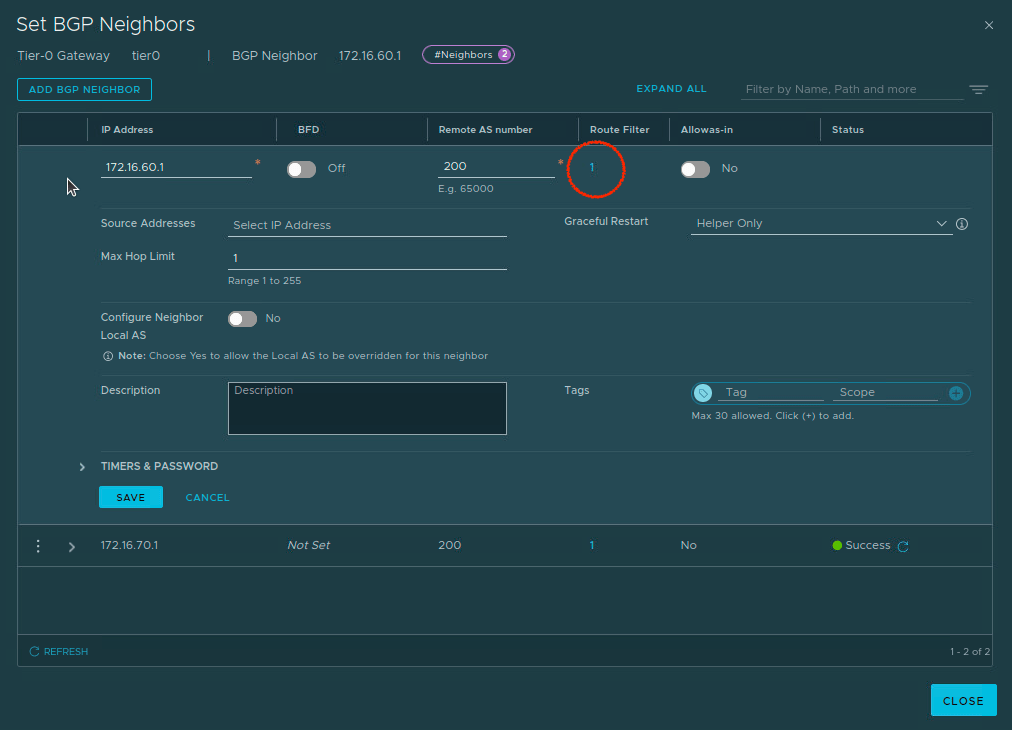
To utilize our new IP Prefix List as a route filter, we navigate to ‘Networking -> Tier-0 Gateways -> <expand target T0> -> BGP -> BGP Neighbors’. Edit each applicable BGP neighbor, and click the number listed under the ‘Route Filter‘ column. If you have never used a route filter in NSX, you will find a default IPV4 route filter, so you will at least see a blue “1” listed under the ‘Route Filter‘ column (circled in red below):
Click the blue number above, and edit the existing ‘IPv4‘ Route filter. Next we click the ‘Configure‘ entry in the ‘Out Filter‘ column, as we are filtering routes that the T0 advertises to the TOR switches. Note: If we were filtering routes being learned from the TOR switches, we would make changes to the ‘In Filter‘ column.
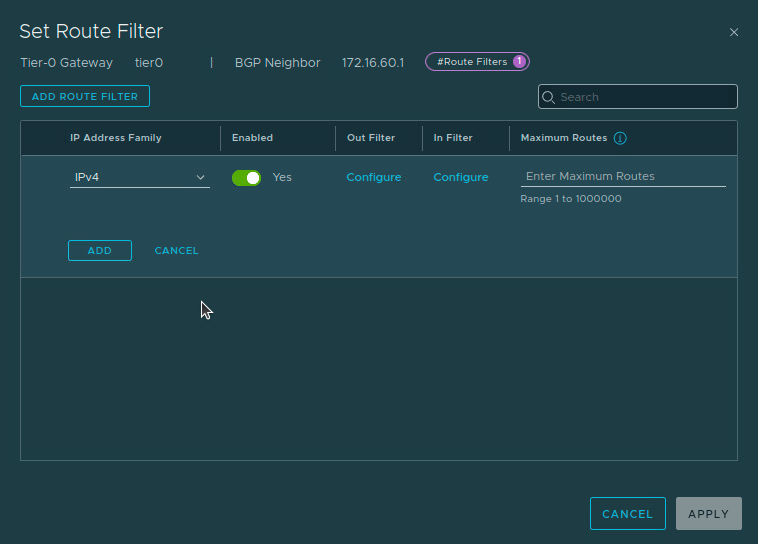
Upon clicking ‘Configure‘, a list of all available Prefix Lists and Route Maps are displayed, and each has a radio button beside it. We’ll select the ‘Deny App Network‘ Prefix List and click ‘Apply‘, which returns us to the ‘Set Route Filter‘ screen above. Click the ‘Add‘ button and then ‘Apply‘. Back at the ‘BGP Neighbors‘ screen, click the ‘Save‘ button on the neighbor we are currently editing.
You would repeat this process for the other neighbors where you wish to apply this outbound filter. In our lab, that means we do the same thing to the ‘172.16.70.1‘ neighbor entry. Once you have finished, click the ‘Close‘ button at the bottom.
Effect of the Prefix List as an Outbound Route Filter
With our outbound route filter in place, our expectation is that our TORs will no longer learn the ‘172.20.20.0/24‘ network prefix from the T0. Let’s take a look at the routing table of ‘TOR Left‘ to see it’s current BGP table:
As you can see, we didn’t just filter out ‘172.20.20.0/24‘; we filtered out all three of the T1 networks our T0 was advertising. Why? Because of the ‘implicit deny‘.
The Implicit Deny
An element of IP Prefix Lists that requires special attention is the implicit deny. This means that if a network prefix has been compared without a match to all entries in the IP Prefix List, it will match against an invisible ‘Deny‘ entry residing at the bottom of the IP Prefix List. Let’s take a look at an example:

Above we have a ‘172.16.0.0/12‘ network prefix compared to an IP Prefix List. This IP prefix list, however, only has two entries created by the admin, which are lines 1 and 2. As ‘172.16.0.0/12‘ does not match either of these, it will be compared to the hidden ‘implicit deny‘ entry at the bottom. As this entry has a ‘Network‘ of ‘any‘, the ‘172.16.0.0/12‘ prefix successfully matches it. The ‘Deny‘ action of the ‘implicit deny‘ entry results in ‘172.16.0.0/12‘ being filtered.
Implicit Deny effect on our IP Prefix List
When we created our IP Prefix List with only one line set to ‘Deny‘ the ‘172.20.20.0/24‘ network prefix, we ultimately end up with an IP Prefix List that has two entries:
- Deny the 172.20.20.0/24 network
- Deny everything else (the ‘implicit deny‘)
This means while the ‘172.20.20.0/24‘ network prefix matched item one and was denied, any other network prefix matched against the ‘implicit deny‘, and was also denied. We’ve inadvertently built an IP Prefix List that prevents the T0 from advertising anything!
Correctly filtering the desired network prefix
To ensure we only filter out ‘172.20.20.0/24‘ while allowing our other network prefixes to be advertised, we must address the ‘implicit deny‘ function of our Prefix List. We could accomplish this in two ways:
- Add new line items to our existing Prefix List configured to ‘Permit‘ each of the desired network prefixes. This would result in two new line items: one for the ‘172.20.10.0/24‘ network prefix, and another for the ‘172.20.30.0/24‘ prefix.
- Add a single ‘Permit‘ line configured for a network prefix of ‘Any‘ below the existing ‘Deny‘ entry for the ‘172.20.20.0/24‘ network prefix.
Option one grants very granular control, but it also requires more work, as you must enter all the networks you wish to permit or deny. Since we only want to block a single network prefix from being advertised, option two is a better choice. The benefit of this configuration is no matter how many additional networks we add to the T1 in the future, all of their network prefixes will be advertised unimpeded.
Note: As Prefix Lists function like an ACL or a firewall policy, entry order matters. If we inadvertently place the ‘Permit Any‘ entry above the ‘Deny 172.20.20.0/24‘ entry, then all network prefixes, including ‘172.20.20.0/24‘ would be advertised, as they’d match against the ‘Permit Any‘ entry first.
Below you can see we’ve modified the IP Prefix List as such:
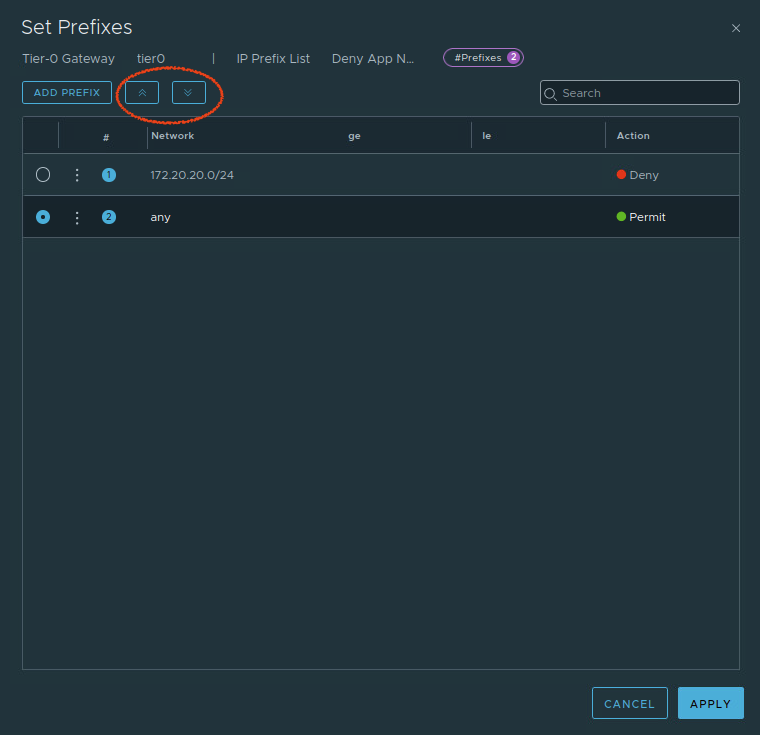
We’ve added the new ‘Permit Any‘ entry, and ensured that it sits below the ‘Deny 172.20.20.0/24‘ entry. By clicking the radio button to the left of any entry, you can move it’s placement up and down in the list by using the circled arrow buttons in the top left hand corner beside the ‘Add Prefix‘ button.
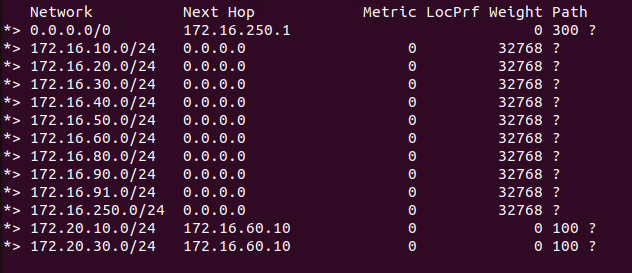
The result of our modification is demonstrated below. You can see we have successfully advertised the ‘172.20.10.0/24‘ and ‘172.20.30/24‘ network prefixes. Conversely, ‘172.20.20.0/24‘ is not in our TOR’s BGP table because we prevented its advertisement out from the T0:
ge and le functions
Thus far we’ve demonstrated a very simple example of creating entries in a Prefix list: entering the exact network prefix we want to match (‘172.20.20.0/24‘) or using an ‘Any‘ to match everything. What if we want to allow or deny several networks via our Prefix list, but we would prefer not to enter each one?
If the target network prefixes are within a network boundary, rather than entering each one manually, we can leverage the ‘ge‘ (greater than or equal to) and/or ‘le‘ (less than or equal to) functions of an IP Prefix List. Let’s look at an example:
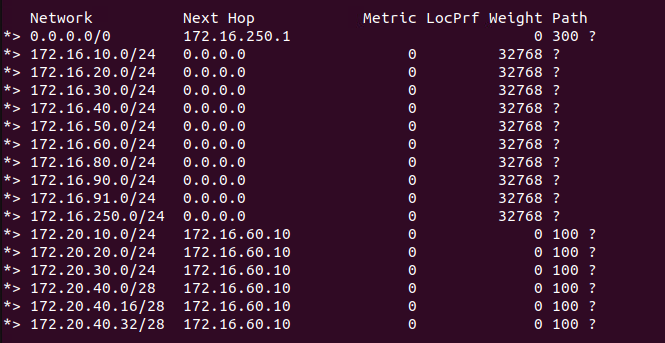
To begin, we’ve added a few additional segments to our T1. The network prefixes for these segments are ‘172.20.40.0/28‘, ‘172.20.40.16/28‘, and ‘172.20.40.32/28‘; you can see them at the bottom of the above screenshot of our TOR. Note: we removed our previous route filter so you can see that we are advertising all of our connected T1 segments.
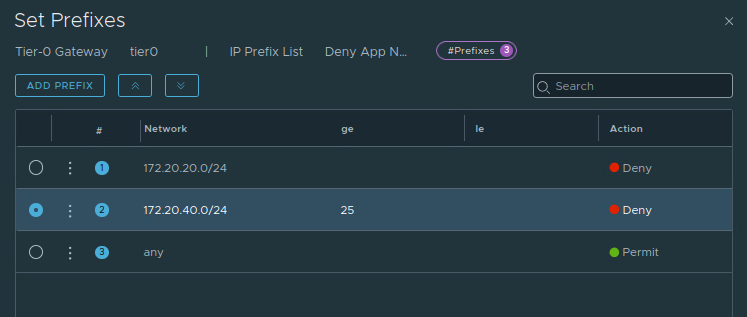
So let’s say we have the same scenario as before, where we want to deny ‘172.20.20.0/24′, but now we also want to deny advertisement of any network that begins with ‘172.20.40‘ as it’s prefix. We certainly could repeat our actions from earlier, creating a total of three new ‘deny‘ entries, like this:

However, since the three subnets fit within a network boundary (‘172.20.40.0/24‘), a better option is to create a single new entry with the ‘ge‘ and ‘le‘ fields populated. Let’s take a look at how the IP Prefix List would look in this version:

If you look at the circled entry, you can see we have entered a network prefix of ‘172.20.40.0/24‘ and both a GE and LE entry of ‘28‘. Once we save this route filter, we can apply it as we did in our previous example as an ‘Out Filter‘ for our BGP neighbors. The results of this action are below:

As before, ‘172.20.20.0/24‘ been removed, but now all three of the ‘172.20.40.x/28‘ networks have been filtered out as well.
The use of ‘ge‘ and/or ‘le‘ (entries for both in each line of a Prefix List are not always required) narrows the scope of what will match for a network prefix. In the above example, we are saying that any ‘/28‘ network that exists inside the boundary of the ‘172.20.40.0/24‘ network will be filtered. Here’s some examples of network prefixes that would or would not be filtered by line 2 of the ‘Deny App Network‘ IP Prefix List:
- ‘172.20.20.0/28‘ would be filtered, as it’s within the ‘172.20.20.0/24‘ boundary, and has a ‘/28‘ mask
- Any other ‘/28‘ network within the ‘172.20.20.0/24‘ boundary would also be filtered (ex. ‘172.20.40.16/28‘, ‘172.20.40.32/28‘, ‘172.20.40.48/28′, and on)
- ‘172.20.40.0/29‘ would not be filtered: it’s within the ‘172.20.40.0/24‘ boundary, but it’s mask (‘/29‘) doesn’t match the ‘28‘ ge and le entries
- ‘172.20.40.0/25‘ would not be filtered: it’s within the ‘172.20.40.0/24‘ boundary, but it’s mask (‘/25‘) doesn’t match the ‘28‘ ge and le entries
Since we opted to use the same mask entries for ge and le, only ‘/28‘ networks that sit inside the ‘172.20.20.0/24‘ boundary would match our Prefix List and be filtered. However, there’s no requirement that the ‘ge‘ and ‘le‘ entries are identical; in fact, it’s far more typical that they do not match, as the intent is usually to filter or allow a varying range of network prefixes. Let’s look at a slightly more advanced example:

Above, we’ve removed our latest route filter, and altered the networks that are attached to the T1. Now our three ‘172.20.40.x‘ T1 attached networks are:
- 172.20.40.0/25
- 172.20.40.128/28
- 172.20.40.144/29
Here are the results of re-applying our previously created IP Prefix List to our BGP neighbor:
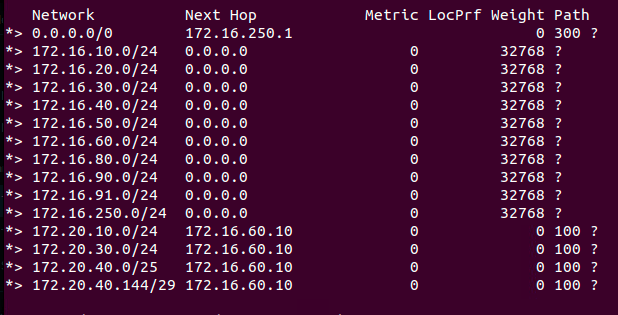
The ‘172.20.20.0/24‘ prefix has been removed again, as expected (as it matches line ‘1‘ of our Prefix List). However, of the three ‘172.20.40.x‘ networks attached to the T1, only the ‘172.20.40.128/28‘ prefix has been filtered out . Why? Because this was the only network prefix that both matched the ‘172.20.40.0/24‘ boundary and had a ‘28‘ network mask.
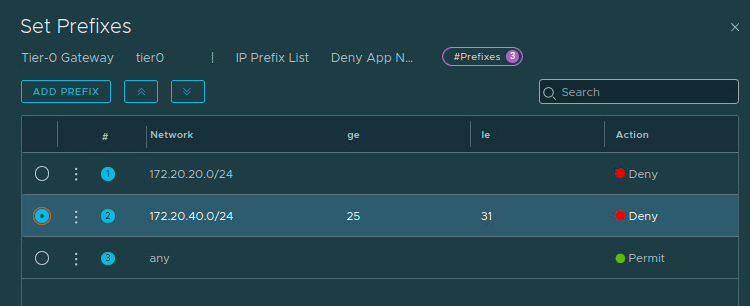
If our desire is to remove all three of the T1 networks, then our Prefix List item could be amended to something like this:
Here we’ve edited item ‘2‘, and configured ‘GE‘ with ‘25‘, and we’ve emptied the ‘LE‘ field. This means that any network prefix within the network boundary of ‘172.20.40.0/24‘ possessing a subnet mask of ‘/25‘ or higher (all the way up to a ‘/32‘) will be filtered. Let’s verify the results on the TOR:

As we can see, all of the ‘172.20.40.x‘ network prefixes have been filtered out.
As a final note on the topic, let’s say we wanted to filter out every prefix that’s is greater than or equal to ‘25‘ in the ‘172.20.40.0/24‘ boundary except for host routes (Host routes are common ways of advertising things like Load Balancer VIPs), which have a network mask of ‘/32‘. To accomplish this, we could change our existing item ‘2‘ in our prefix list to have an ‘le‘ entry of ‘31‘.
Configured as such, network prefixes would match this entry if they have a subnet mask greater than or equal to ‘/25‘, less than or equal to ‘/31‘, and are within the network boundary of ‘172.20.40.0/24‘. It would appear like the below:
With the above in place, any advertised ‘/32‘ network prefix within the ‘172.20.40.0/24‘ boundary would be allowed (as it would match the ‘Permit Any‘ at line ‘3‘). All other ‘172.20.40.x‘ network prefixes with a subnet mask of ‘/25‘ through ‘/31‘ would be denied advertisement by line ‘2‘.
Wrap Up…
Today we covered what an IP Prefix List is in NSX, and how you can use it directly to filter routes for BGP neighbors. In particular, we discussed how to build out an IP Prefix List while addressing the impact of the ‘implicit deny‘ feature. We also demonstrated the flexibility of the ‘ge‘ and ‘le‘ functions when populating an IP Prefix List.
For our next post, we’ll show how an IP Prefix List can be utilized in NSX Route Maps, and the advanced options that a NSX Route Map provides. Hope to see you later!
