Before we begin, let’s recap the steps that we are following for our TCE Cluster deployments. In order:
- Install Tanzu Community Edition
- Prepare to deploy clusters
- Deploy a management cluster
- Deploy a workload cluster
Last time, we successfully deployed our Tanzu Community Edition (TCE) Management cluster (Step 3). For our final step of the TCE deployment,we’ll be deploying a workload cluster.
4. Deploy a workload cluster
Luckily for us, most of what is required to deploy a TCE workload cluster was created when we instantiated the TCE Management cluster. That is, we’ll be deploying the cluster nodes to the same Distributed Switch Port Group (DVPG) where the Management cluster nodes reside, so the existing DHCP scope there will cover the new Workload nodes, and we previously set aside 2 IP addresses (one of which has been used for the TCE Management cluster) for cluster management communications.
The official instructions for the Workload cluster deployment may be found here (Deploy a workload cluster), and provide a clear explanation of the steps involved. As in our previous posts, we’ll try to steer clear of repeating what already exists elsewhere, and instead will offer guidance around what is required to deploy the NSX Application Platform (NAPP).
In the ‘Before you begin‘ section of the instructions, you’ll find the topic of namespaces, and how you can create them. As the sole intent of our TCE deployment here is for NAPP, there’s no real need for you to create a new namespace for the Workload cluster deployment; it’ll simply sit in the ‘default’ namespace.
Creating your Workload YAML file
As stated in ‘Deploying a Workload Cluster Procedure‘, we’ll be copying the YAML file that was generated for us during the Management cluster deployment, and then editing this new YAML file to deploy our Workload cluster. The original file is located in the ~/.config/tanzu/tkg/clusterconfigs/ directory. Just create a copy and edit it with the editor of your choice.
The file itself is fairly human readable; we’ll include a snippet of the first 20 lines or so here for context:
AVI_CA_DATA_B64: ""
AVI_CLOUD_NAME: ""
AVI_CONTROL_PLANE_HA_PROVIDER: ""
AVI_CONTROLLER: ""
AVI_DATA_NETWORK: ""
AVI_DATA_NETWORK_CIDR: ""
AVI_ENABLE: "false"
AVI_LABELS: ""
AVI_MANAGEMENT_CLUSTER_VIP_NETWORK_CIDR: ""
AVI_MANAGEMENT_CLUSTER_VIP_NETWORK_NAME: ""
AVI_PASSWORD: ""
AVI_SERVICE_ENGINE_GROUP: ""
AVI_USERNAME: ""
CLUSTER_CIDR: 100.96.0.0/11
CLUSTER_NAME: k8s-mgmt
CLUSTER_PLAN: prod
ENABLE_AUDIT_LOGGING: "false"
ENABLE_CEIP_PARTICIPATION: "false"
ENABLE_MHC: "true"
IDENTITY_MANAGEMENT_TYPE: none
INFRASTRUCTURE_PROVIDER: vsphere
All of the configuration options are in alphabetical order, so the first entries are related to the AVI (aka NSX Advanced Load Balancer) configuration options. Note that, as we are not using the NSX Advanced Load Balancer, all of the values for the ‘AVI_*‘ keys are blank.
Now that you understand the structure of your YAML file, let’s identify a few items you may or will alter:
- CLUSTER_NAME: We recommend setting this to something that identifies the intent of the cluster; we’re using ‘k8s-napp‘ for our deployment here.
- CLUSTER_PLAN: We recommend that for both your Management and Workload clusters that this field is set to ‘prod‘; as previously described, selecting ‘prod‘ ensures you have 3 control plane nodes deployed for high availability. For a lab deployment, you could set this to ‘dev‘, which deploys a single control plane node.
- VSPHERE_CONTROL_PLANE_ENDPOINT: This should be set to the 2nd IP address that you reserved previously for the Management cluster deployment.
- VSPHERE_FOLDER: If you’d like to place the nodes for your Workload cluster in a different VM folder, you can configure this here. Obviously, you need to create the folder in vSphere before being able to select it here.
- VSPHERE_RESOURCE_POOL: If you have a vSphere resource pool you’d like to utilize for your workload cluster, enter it here.
Before we move on, there are a few more items in the YAML file to discuss, which are specifically about resources for your worker nodes. But first…
Worker Cluster and NAPP requirements
First let’s check the NAPP requirements in order to size our Worker nodes appropriately. We’ll provide a snapshot of the current requirements below for reference:
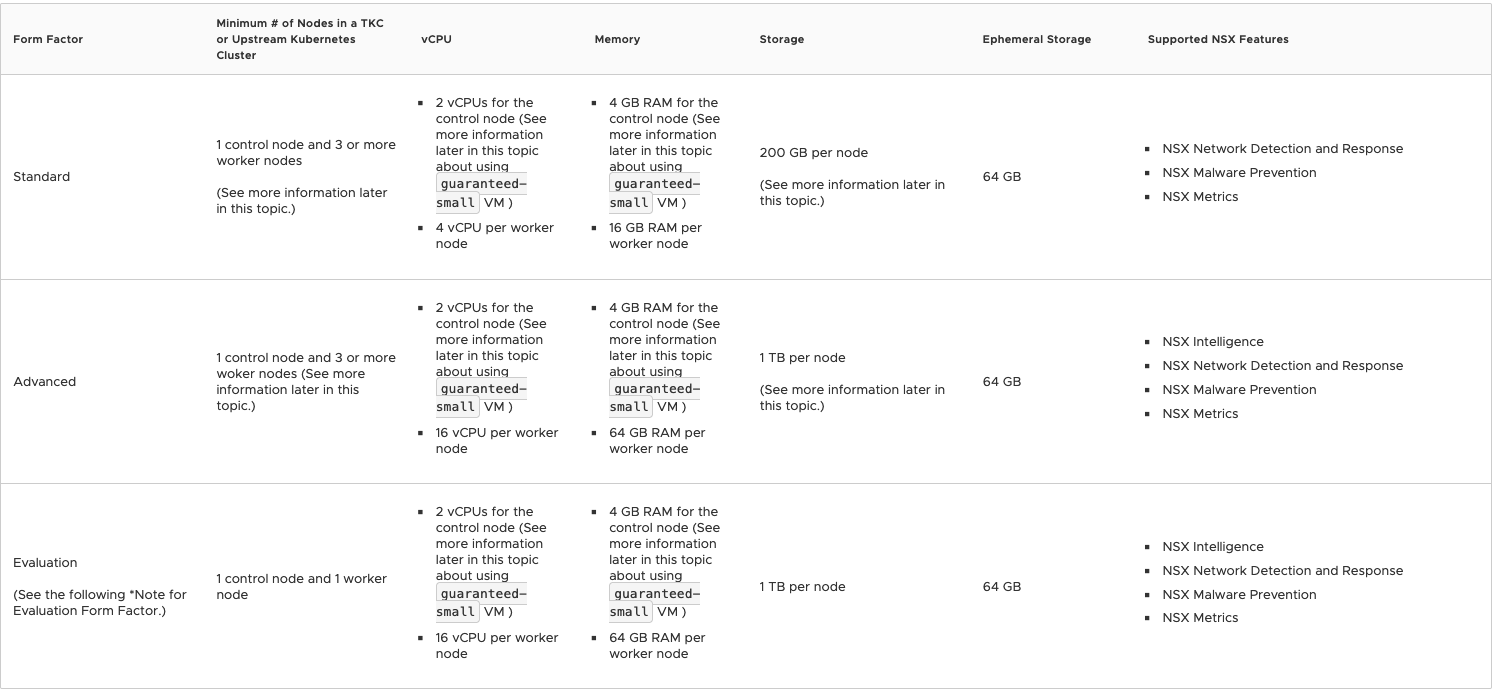
So in the above, you can see there are three ‘Form Factors‘ listed, which are ‘Standard‘, ‘Advanced‘ and ‘Evaluation‘. There a few differentiators to identify which of these you should be utilizing, but before we identify those, let’s recap at the four features that NAPP provides:
- NSX Intelligence
- NSX Network Detection and Response
- NSX Malware Prevention
- NSX Metrics
With these four features in mind, now let’s review how they’re applicable to the required form factors:
- Standard – supports all NAPP features except for NSX Intelligence
- Advanced – supports all NAPP features
- Evaluation – supports all NAPP features (for lab/non-prod environments)
So, for your production environment, the sizing for your worker nodes is functionally dictated by deciding if NSX Intelligence is a requirement. If you are using NSX Intelligence, worker nodes must match the requirements in the ‘Advanced‘ form factor. If you are not using NSX Intelligence, then the worker nodes should match the data listed under ‘Standard‘. As an aside, unless you’re truly doing an evaluation, we’d recommend ignoring the ‘Evaluation‘ form factor entirely.
For full transparency, the lab we utilize doesn’t have a host with 16 vCPU, so we’ll be deploying using the ‘Standard‘ form factor for our NAPP deployment. While this means we can’t use NSX Intelligence in our environment, you’ll see that deploying NAPP with or without NSX Intelligence follows the same path.
Back to our Workload YAML file…
Now that we know the form factor that is required for our worker nodes, let’s edit the same Workload YAML file as from above. Since we know that we’ll be using the ‘Standard’ form factor, our settings should match the below:
- VSPHERE_WORKER_DISK_GIB: “200”
- VSPHERE_WORKER_MEM_MIB: “16384”
- VSPHERE_WORKER_NUM_CPUS: “4”
- WORKER_MACHINE_COUNT: “3”
A note: The minimum cluster size for your TCE Workload Cluster to support NAPP is one (1) control plane node and three (3) worker nodes. That said, in NAPP System Requirements, it’s noted that you should consider using two additional worker nodes for availability and resiliency of the solution. So, while in our lab, we will be moving on with the bare minimum (which is three (3) workers), you should consider deploying at least five (5) workers here, and set the ‘WORKER_MACHINE_COUNT‘ to five (5).
For the control plane nodes of your Workload cluster, since we opted for the “Medium” build out during the Management cluster deployment, your existing configuration in your YAML file should be sufficient. However, you will find a recommendation from VMware when using Tanzu that your control plane nodes on your NAPP cluster should have 64 GB of storage. With that being said, here’s what your control plane configurations should look like in the Workload YAML file:
- VSPHERE_CONTROL_PLANE_DISK_GIB: “64”
- VSPHERE_CONTROL_PLANE_MEM_MIB: “16384”
- VSPHERE_CONTROL_PLANE_NUM_CPUS: “4”
- CONTROL_PLANE_MACHINE_COUNT: “1”
As mentioned previously, for high availability in the TCE Workload Cluster control plane, you should deploy three (3) control plane nodes instead of one (1). We’re deploying a single control plane node to reduce contention in our lab, but for production, you should entertain using the recommended three (3).
Deploying our Workload Cluster
Now that we’ve successfully created and edited our Workload Cluster YAML file, it’s finally time to create our Workload cluster. From your bootstrap machine, issue the following command:
tanzu cluster create <WORKLOAD-CLUSTER-NAME> --file <CONFIG-FILE>
You’ll want to replace <WORKLOAD-CLUSTER-NAME> with the cluster name you’ve chosen, and <CONFIG-FILE> with the location of the Workload YAML file. Once you’ve done that, the process of creating your Workload cluster begins. From the CLI you’ll see:

The Tanzu cli will validate the YAML file provided, and then begin deploying the K8s nodes to vSphere. As an aside, you’ll notice the line in the above screenshot regarding ‘Pinniped configuration not found‘. Pinniped is utilized for external authentication into Kubernetes. Since we did not configure any external configuration methods for our Management cluster, our Workload cluster is also not configured with any external authentication methods. We just wanted you to be aware that, with no authentication methods configured for your TCE cluster, this is an expected warning message.
Now we wait for the cluster to be deployed. If you like, you can go over to vCenter and watch the node VMs being provisioned from the template you previously created. When the Workload cluster is fully deployed, you’ll receive a message in the Tanzu CLI informing you of such. Here’s an output of a full Workload cluster deployment in our environment:

Add the Workload Cluster to your kubeconfig file
Before we wrap up our post on deploying a TCE Workload cluster, we need to make sure that you can communicate with your new cluster via kubectl. Before we discuss how to do this, let’s briefly address how one administers K8s clusters via kubectl.
For kubectl to access a given cluster, it requires three pieces of data in it’s kubeconfig file (by default, this exists at ~/.kube/config): k8s clusters, users, and contexts. If you edit your existing kubeconfig file , you’ll see these pieces of data pretty easily.
Here’s a copy of our existing one; remember at this point, we’ve instantiated a TCE Management cluster and a Workload cluster. Also, note that in below we’ve removed all the certificate data and replaced it with <<removed>> just to make things easier to read.
apiVersion: v1
clusters:
- cluster:
    certificate-authority-data: <<removed>>
    server: https://172.16.90.150:6443
  name: k8s-mgmt
contexts:
- context:
    cluster: k8s-mgmt
    user: k8s-mgmt-admin
  name: k8s-mgmt-admin@k8s-mgmt
current-context: k8s-mgmt-admin@k8s-mgmt
kind: Config
preferences: {}
users:
- name: k8s-mgmt-admin
  user:
    client-certificate-data: <<removed>>
    client-key-data: <<removed>>
As you can see, we have a single cluster named k8s-mgmt (each cluster entry under ‘clusters‘ starts with a “–“; we only have one cluster listed presently) and under ‘users‘ you can see we have a single user named ‘k8s-mgmt-admin‘.
If you look in the middle of the data, you’ll see another area called ‘contexts‘. A context in K8s is the combination of a user and the cluster with which they wish to communicate. So, when using kubectl, you’ll select a given context, which in turn, dictates which cluster you will access and with which user you will utilize.
Right now we only have one context in our kubeconfig file (which was automatically inserted by the TCE installer), and it’s for our TCE Management cluster. To easily add our new Workload cluster, user, and context, you may use the following command:
tanzu cluster kubeconfig get <WORKLOAD-CLUSTER-NAME> --adminIn our case, we enter ‘tanzu cluster kubeconfig get k8s-napp –admin‘ as ‘k8s-napp‘ is the name of our Workload cluster. This yields the following output:

The cluster, user, and context for the Workload cluster are now inserted in our kubeconfig file, and we are even provided the kubectl command (‘kubectl config use-context k8s-napp-admin@k8s-napp‘) to switch over to this particular context. As an aside, you can see all of the contexts that exist in your kubeconfig file with the command ‘kubectl config get-contexts‘ and your current context via ‘kubectl config current-context‘.
If you wish, you may review the contents of your kubeconfig file to see what has changed after using the ‘tanzu cluster kubeconfig get k8s-napp –admin‘ command. Here’s the output of our current kubeconfig file with the certificate data removed, as we did previously:
apiVersion: v1
clusters:
- cluster:
    certificate-authority-data: <<removed>>
    server: https://172.16.90.150:6443
  name: k8s-mgmt
- cluster:
    certificate-authority-data: <<removed>>
    server: https://172.16.90.151:6443
  name: k8s-napp
contexts:
- context:
    cluster: k8s-mgmt
    user: k8s-mgmt-admin
  name: k8s-mgmt-admin@k8s-mgmt
- context:
    cluster: k8s-napp
    user: k8s-napp-admin
  name: k8s-napp-admin@k8s-napp
current-context: k8s-mgmt-admin@k8s-mgmt
kind: Config
preferences: {}
users:
- name: k8s-mgmt-admin
  user:
    client-certificate-data: <<removed>>
    client-key-data: <<removed>>
- name: k8s-napp-admin
  user:
    client-certificate-data: <<removed>>
    client-key-data: <<removed>>
As you can see in the above, we now have two cluster entries defined, two users defined, and two contexts defined. As previously stated, each context is made up of a combination of a user and a cluster; for example, the ‘k8s-napp-admin@k8s-napp‘ context is comprised of the ‘k8s-napp‘ cluster and the ‘k8s-napp-admin‘ user.
Generate a Tanzu Kubernetes Cluster Configuration File
There’s one final step we should complete today, since we are already working with kubectl. During your NAPP deployment, you will be asked to supply a kubeconfig file to the NAPP wizard. This supplied kubeconfig file provides the NSX-T manager with the cluster IP and user credentials necessary to deploy containers to your K8s workload cluster.
In the NAPP documentation, there is a article named ‘Generate a Tanzu Kubernetes Cluster Configuration File with a Non-Expiring Token‘, and it’s expressly written for customers who are using Tanzu to deploy NAPP. In specific, this article is built to help Tanzu users avoid a potential annoyance in deploying, upgrading, or deleting NAPP; nothing here will affect NAPP day to day functionality.
Our deployment throughout this series has utilized TCE, which is derived from the same core components that VMware Tanzu utilizes; however, in this instance, our TCE admin account doesn’t utilize the expiring token that’s referenced in the aforementioned article. We could simply create a kubeconfig file that only contains our workload cluster/user/context, and that would work for our purposes.
However, if you look over the procedure itself, you’ll see that the suggested solution creates a K8s service account and an associated token. From a Kubernetes best practices standpoint, we believe this is a better solution than simply using our existing admin account for the cluster.
You may implement the steps as listed, aside from step 1, as it’s specifically written for use on a VMware Tanzu (not TCE) deployment. For our purposes, your “step 1” is to login to your workload cluster context; at this point, all the subsequent steps are identical. As we mention in the preceding section of this post, our workload cluster is named ‘k8s-napp‘ and it’s associated context is ‘k8s-napp-admin@k8s-napp‘. Therefore, our step one is to execute:
kubectl config use-context k8s-napp-admin@k8s-nappThis command moves us to our workload context (remember, your context name may be different). Now that we are in the workload context, you may execute steps 2-7 exactly as written. Please ensure that for step 5, you replace <file-name> with the actual name of the kubeconfig file you wish to create; in our lab, we named it ‘napp-kubeconfig‘.
Once you’ve completed all steps (also, note that step 7 is a future step; you may safely ignore it for now), you will be in possession of a kubeconfig file. Please note where you save it, as you will be providing this file to your NSX-T Manager during your NAPP deployment.
Wrap-Up
At this point in our series, we’ve successfully deployed a Harbor instance, as well as our required Kubernetes infrastructure by way of Tanzu Community Edition. We only have one more topic to cover before our NAPP deployment, and that is service load balancing via MetalLB.
See you next time!
