Edge Node Bridging and High Availability
If you’ve been following our NSX-T Bridging series, you’re aware that each bridge in NSX-T runs in an Active/Standby model, where one Edge Node VM is responsible for running the ‘active‘ bridge instance, and another Edge Node VM has the responsibility of being prepared to take over in the event of an issue.
Today we’d like to spend some time investigating how NSX-T bridging works from the high availability (HA) perspective and the events that occur when bridging instance goes from ‘standby‘ to ‘active‘. We will also be touching on a few of the CLI commands that can be executed on an Edge Node VM to observe a bridging instance’s status.
Full disclosure: While we are tackling high availability for bridging in this post, utilizing an active/standby model is not mandatory. That is, you could create a bridge with a single ‘active‘ instance with no ‘standby‘. However, this places you in a single point of failure scenario, and certainly is not recommended best practice. As such, the examples below are built on the architecture of two Edge Node VMs providing ‘active/standby‘ roles for a given bridging instance.
How NSX-T bridging “works”
Let’s quickly recap the bridging function in NSX-T. A bridge takes layer-2 frames from an overlay segment and places them in a given VLAN via an 802.1q tag. The inverse of this is true as well; traffic with the appropriate 802.1q tag is received by the bridge, has it’s 802.1q wrapper removed, and is then placed on the overlay switch headed to it’s destination.
Below is a depiction of a simple bridged environment. On the left we have two servers, attached to VLAN 100. On the right, we find a single NSX-T prepared host with 2 VMs that are attached to an overlay segment. In the center, we have two additional ESXi hosts; each host contains an Edge Node that is either ‘active‘ (as depicted by the “A” symbol) or ‘standby‘ (depicted by the “S” symbol) for our bridging instance.
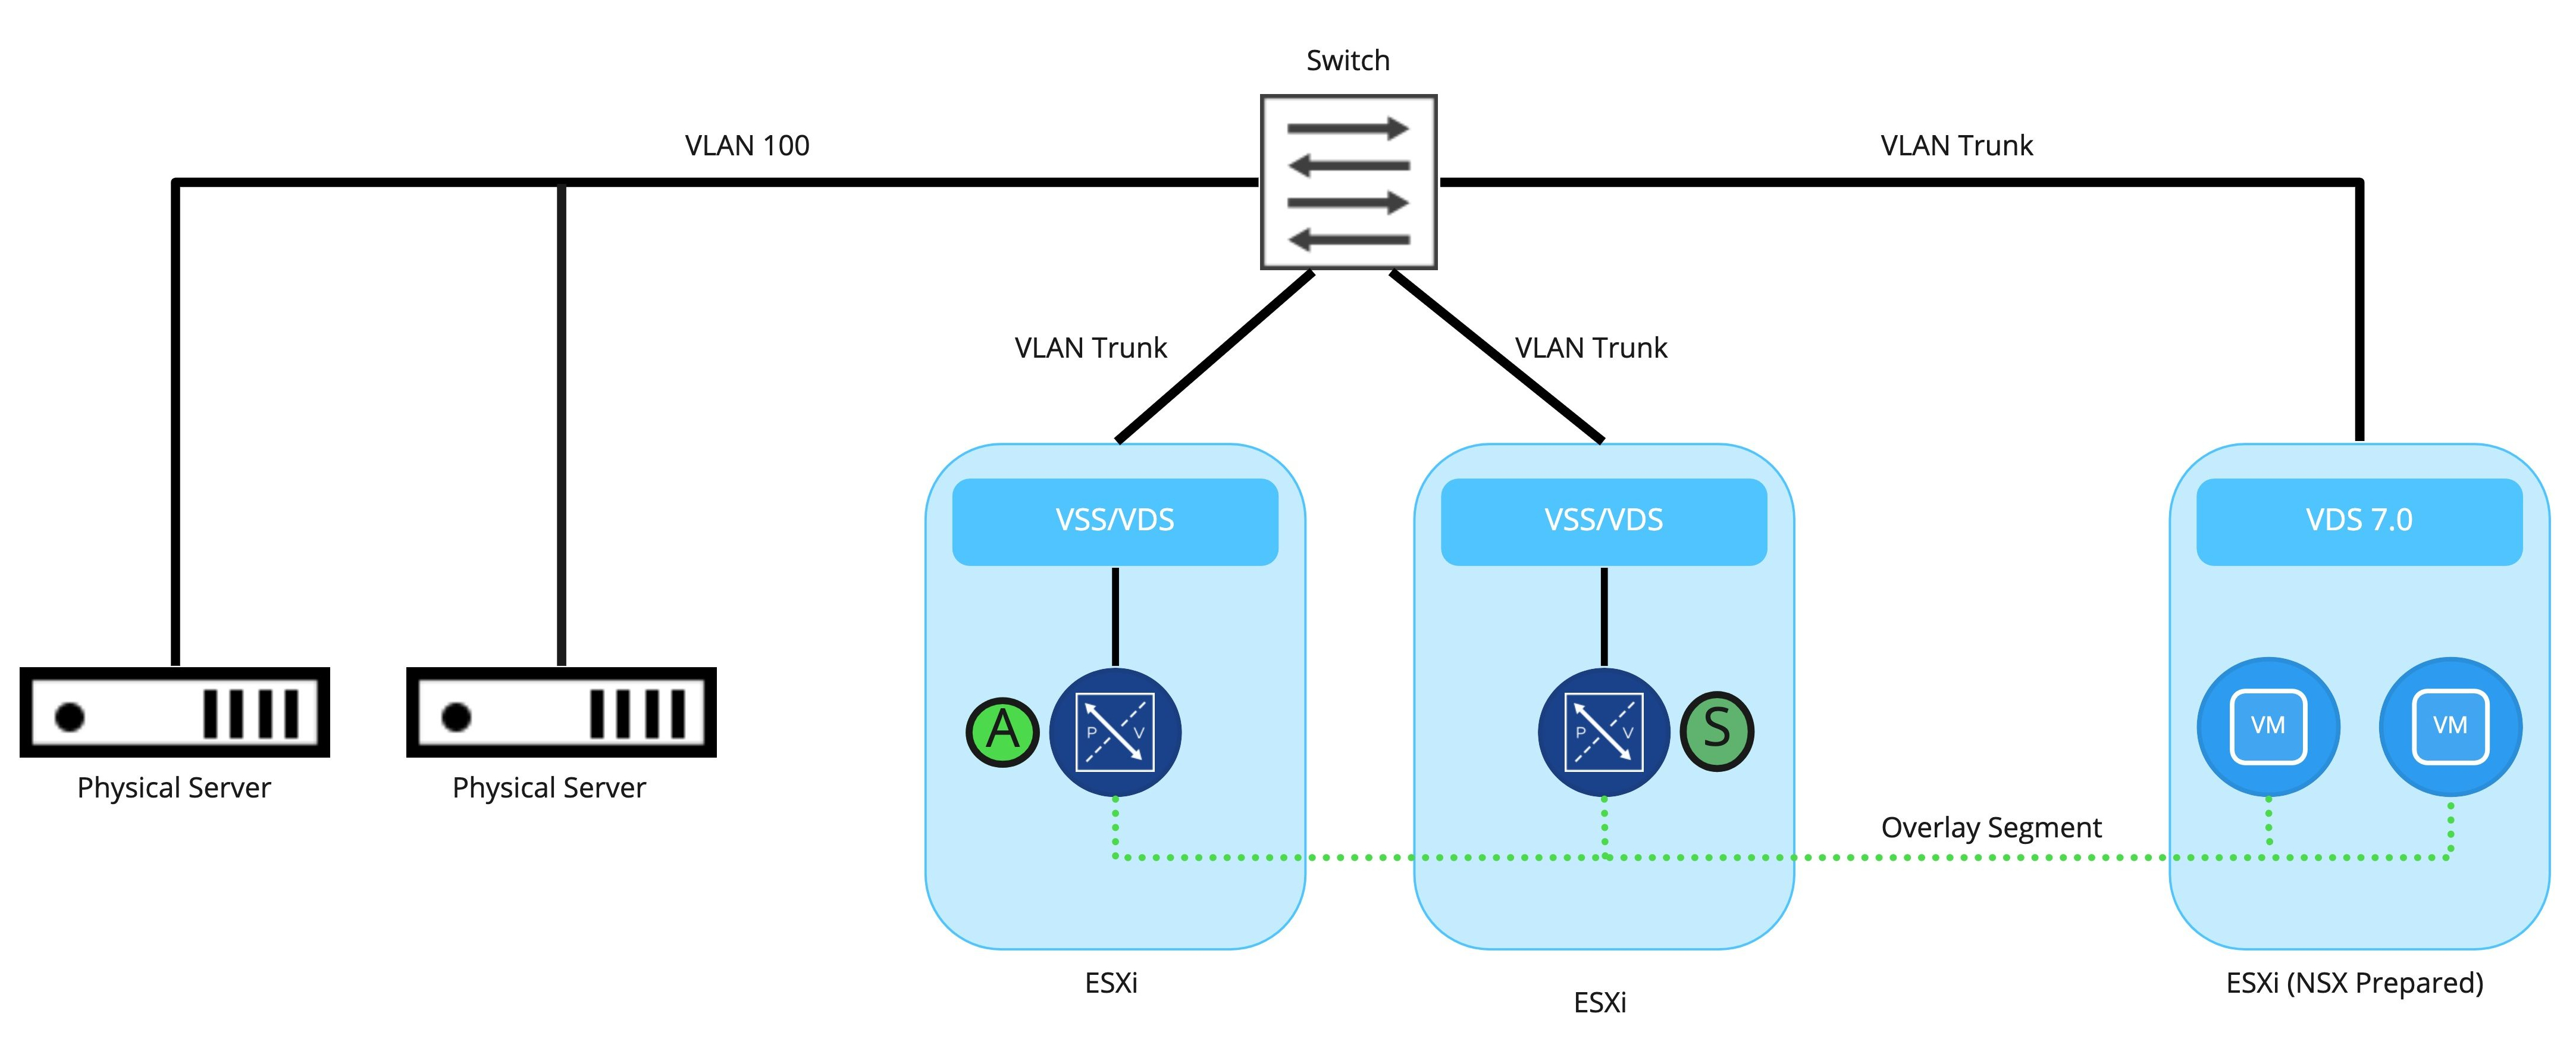
The actual bridging of traffic is handled by the ‘active‘ bridge instance which is in a ‘Forwarding‘ state; the standby instance on a different Edge Node is not participating in the actual forwarding of traffic, as it is in a ‘Blocking‘ state.
As shown above, When the ‘active‘ bridging instance goes down (for example, the Edge Node VM upon which it resides is shut down, or perhaps you issued the ‘set bridge <uuid> state active‘ command), the ‘standby‘ will transition into the ‘active‘ role. The newly ‘active‘ bridging instance will now move to the ‘Forwarding‘ state.
High Availability Changes and Physical Switches
While understanding how ‘active‘ and ‘standby‘ bridging instances operate in general is straightforward, let’s look at how the physical switches participate in bridging, and how they are affected by a high availability change.

Here we see a bridge being actively performed by Edge Node VM 01 (EN01), while Edge Node VM 02 (EN) is in standby. From a physical switching perspective, all of the MAC addresses that exist on the bridged NSX segment (MAC addresses for VM “A” and VM “B”) have been learned on the physical port connected to the ESXi server where EN01 resides. The physical switch will send all traffic destined to these MAC addresses out of this port.

As depicted above, the bridging instance on EN02 has moved into the ‘active’ state as EN01 is unavailable. However, the physical switch has no idea that anything has changed; it still believes all of the learned NSX segment MAC addresses reside on the physical port utilized by EN01. Remember, the Edge Node VM is connected to the physical network via a VSS/VDS; the physical switch is unaware that EN01 has failed.
As the physical switch learns the VM MAC addresses reside on a new port via traditional MAC learning, traffic from the VLAN side of the bridge is appropriately sent to EN02. However, until each MAC address of the VMs on the NSX segment are learned, traffic may incorrectly be sent over to the port where EN01 was providing bridging.
So, how can the newly ‘active‘ bridging instance quickly notify the physical switching environment that all of the VM MAC addressess have moved to a new switch port? The answer is RARP.
RARP
RARP (reverse ARP protocol), as utilized by bridging instances in NSX-T, quickly updates a physical switch port with all of the VM MAC addresses on a bridged NSX segment . To understand how it provides this functionality, let’s take a look at a RARP frame:
18:09:55.900609 00:50:56:01:0a:80 > ff:ff:ff:ff:ff:ff, ethertype Reverse ARP (0x8035), length 60: Reverse Request who-is ff:ff:ff:ff:ff:ff tell 00:50:56:01:0a:80, length 46As you see above, there’s no layer-3 information here at all; this is simply a pure layer-2 construct. We see a source MAC of 00:50:56:01:0a:80 and it’s destined for the broadcast address of ff:ff:ff:ff:ff:ff. Looking deeper into the frame, we see ‘Reverse Request who-is ff:ff:ff:ff:ff:ff tell 00:50:56:01:0a:80‘.
The purpose of the RARP frame is notify switches that the source MAC address (00:50:56:01:0a:80) resides on a given switch port. Remember, physical switches learn where MAC addresses reside by observing traffic. Since our active bridge has now moved to a different Edge Node VM, the port on a physical switch where bridged frames are being sent has changed (unless you put both Edge Node VMs providing this bridge on the same ESXi host, which is a really poor idea from a single point of failure standpoint.)
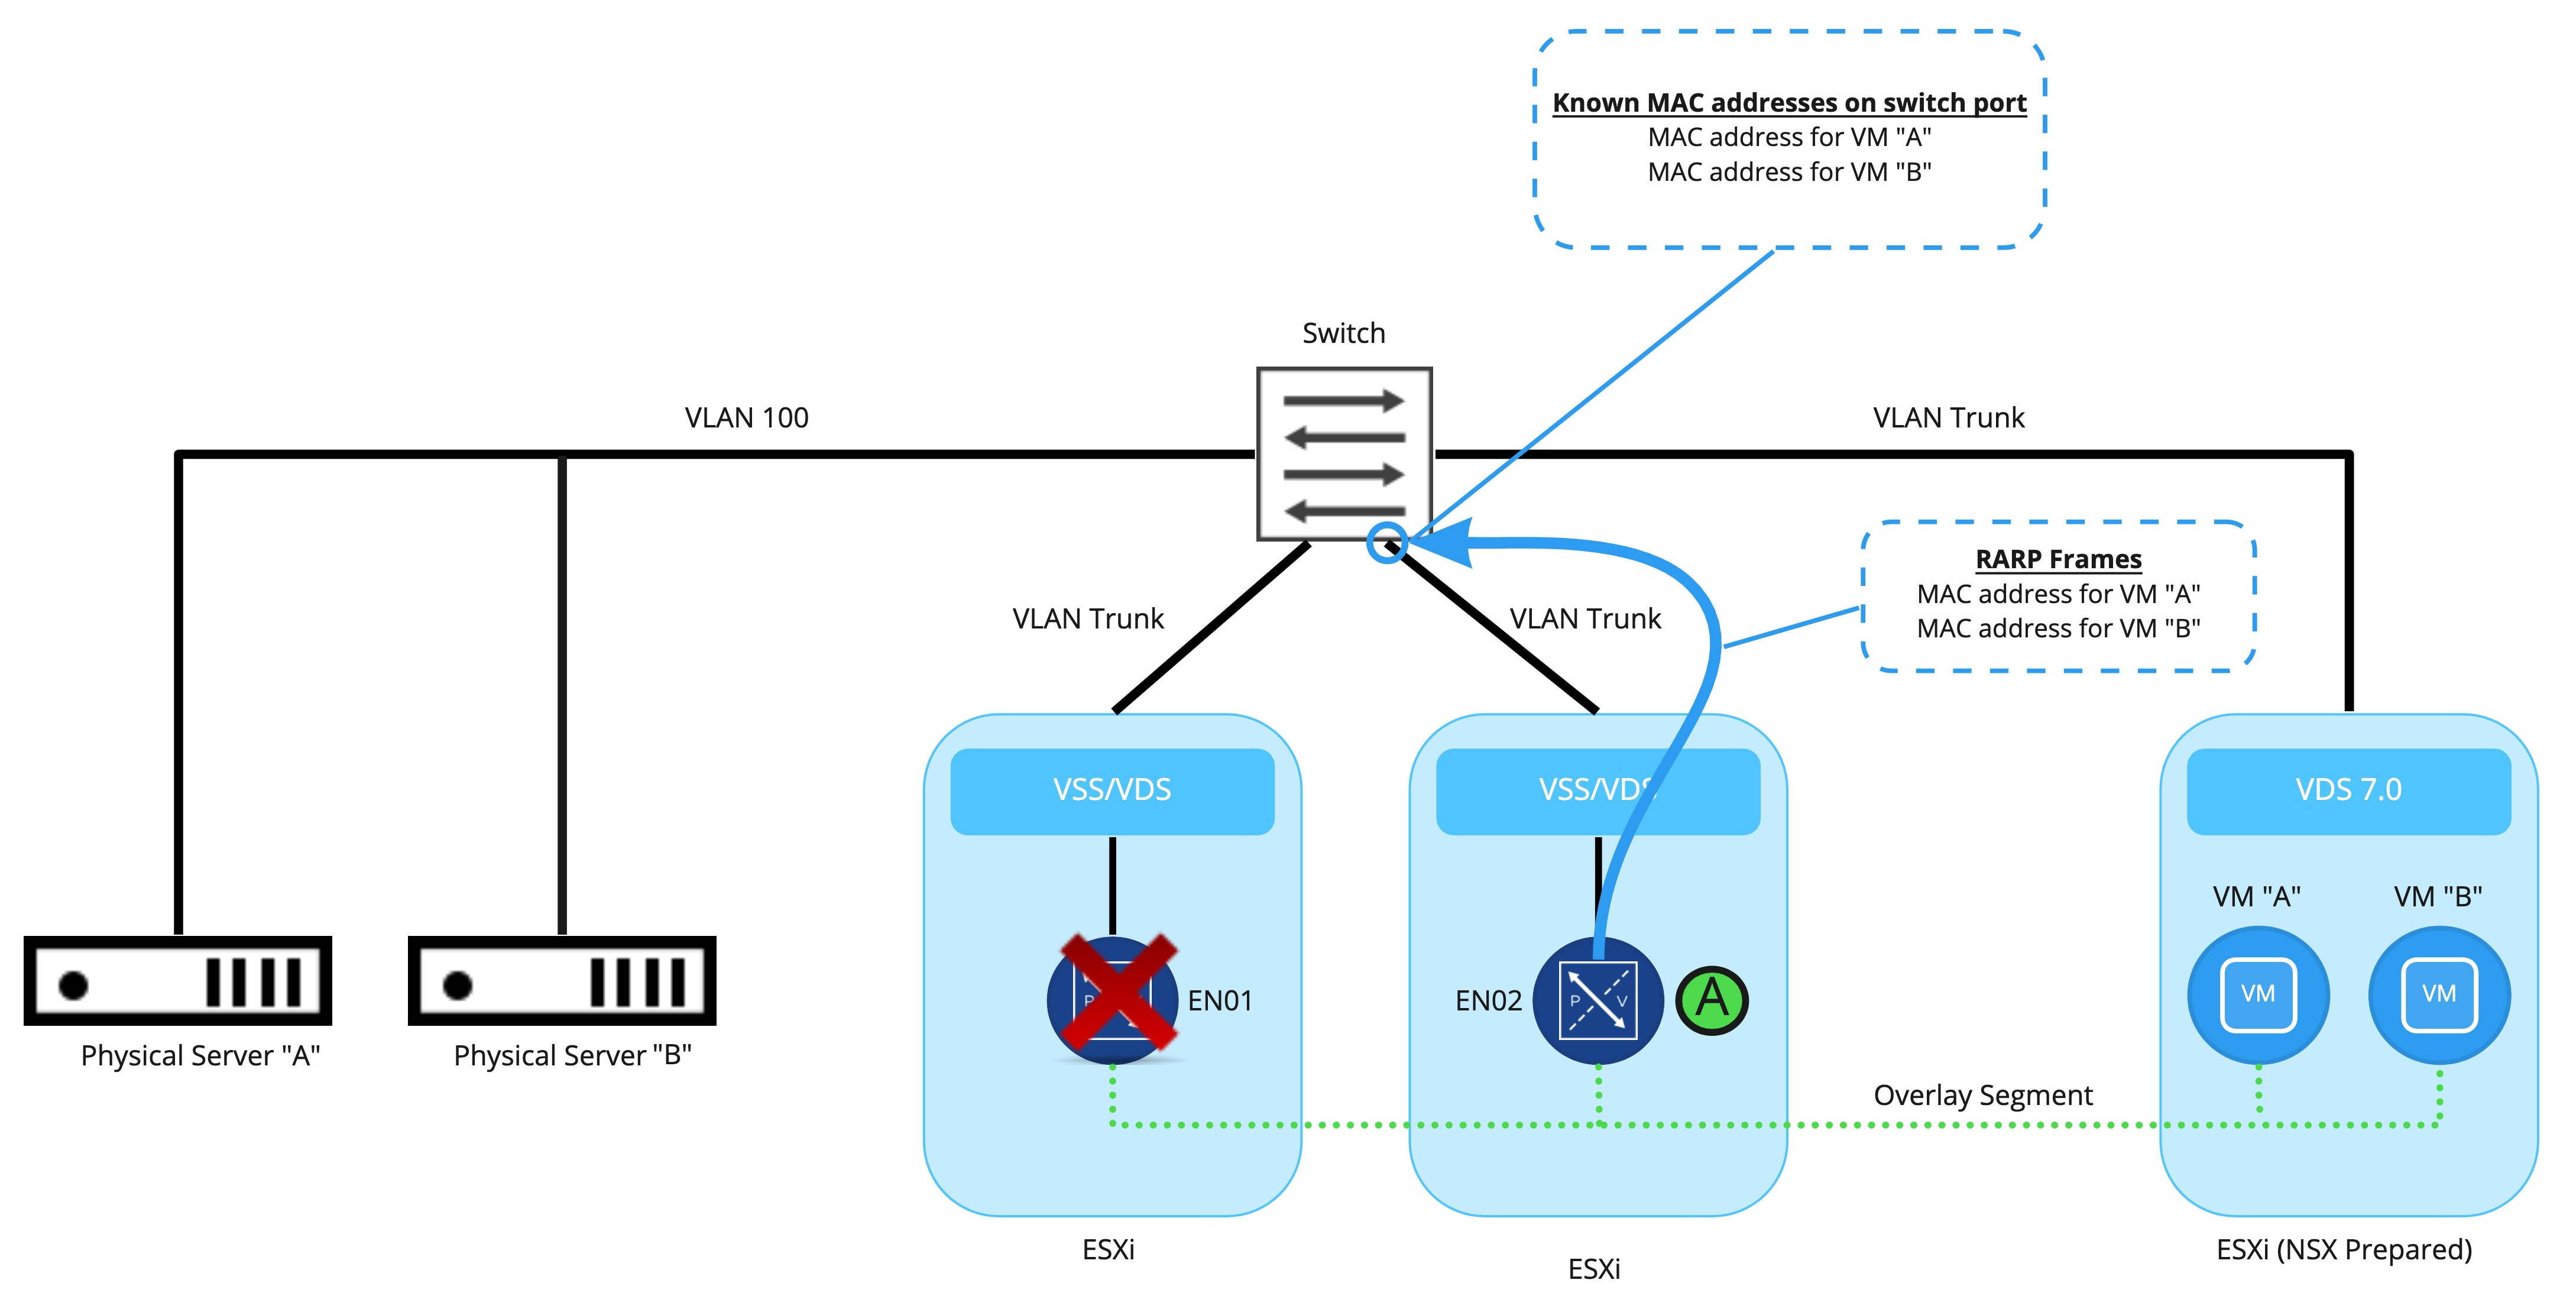
As seen here, the bridging instance on EN02, upon taking the ‘active‘ role, floods out RARP frames for the MAC addresses of VM “A” and VM “B” to the physical switch. These frames immediately update the physical switch that these MAC addresses now reside on a new port. This action results in the physical switch appropriately sending frames destined for VM “A’ or VM “B” to the newly ‘active‘ bridging instance.
While we have focused on how RARP frames update the physical switches, when a bridging instance becomes ‘active‘, RARP frames are also sent to the overlay segment. The RARP frames themselves are generated based on the observed MAC addresses that have traversed the bridge from the VLAN side.
To recap, RARP frames are sent to each side of the bridge:
- The bridged NSX overlay segment is flooded with RARP frames for each of the MAC addresses on the VLAN side of the bridge. Note that this will not be for all devices that reside on this VLAN, just the ones that traverse the bridge.
- The VLAN side of the bridge is flooded with RARP frames for all of the virtual machine MAC addresses that reside on the NSX segment.
NSX-T Bridging and MAC address tracking
In the material above, we’ve discussed how RARP packets inform each side of the bridging instance that the ‘standby‘ has taken the ‘active‘ role. The newly ‘active‘ bridging instance, in order to generate the necessary RARP frames, needs to know the MAC addresses on the VLAN side of the bridge, as well as the MAC addresses on the NSX segment. This data is obtained by the newly ‘active‘ bridging instance via two methods:
- MAC addresses on the NSX segment side are known to the controller services running on your NSX-T Manager VMs. As the controllers are aware of the MAC addresses of each VM that resides on a NSX segment, this information is utilized in creating the RARP frames that are forwarded to the VLAN side of the bridge.
- VLAN side MAC addresses have been learned via data plane by the initial ‘active‘ bridging instance; the MAC addresses are recorded as they traverse the bridge and is regularly synced to the ‘standby‘ bridge. When the ‘standby‘ is moved to ‘active‘, it already has a list of the VLAN side MAC addresses thanks to this process.
Gathering Bridge data on an Edge Node VM
Now that we have a good understanding of what is happening when a bridging instance moves from ‘standby’ to ‘active’, let’s review some of the bridge related commands available on an Edge Node VM.
Issuing ‘get bridge summary‘ from the CLI (this is NSX-T 3.1) provides a brief rundown of all bridges that exist on the edge node. For a deeper look at a particular bridge, you may take a bridge UUID gathered form the previous command, and issue ‘get bridge <bridge uuid>‘. Below is an example of this command an Edge Node running an active bridge.
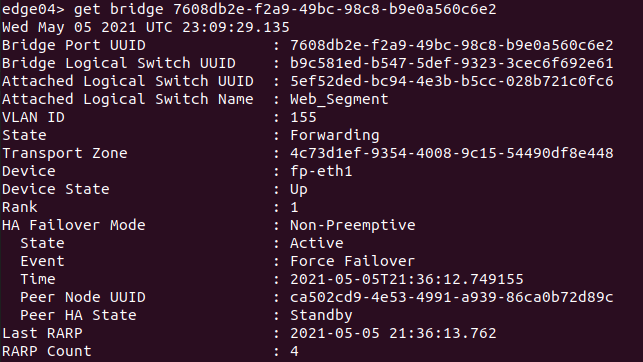
While all of the data produced is valuable, there are some pieces that are of particular interest when looking at HA status of a bridge:
- State – This shows the state of this particular bridge instance, and will either be ‘Forwarding’ on the active bridge instance or ‘Blocking’ on the standby bridge instance.
- State (under HA Failover Mode) – should be either ‘Active’ or ‘Standby’, depending on this Edge Node VMs current role for this particular bridge instance
- Event (under HA Failover Mode) – depicts the event that caused the last HA transition
- Peer HA State (under HA Failover Mode) – Depicts the peer Edge Node VMs current role for this particular bridge instance
- Last RARP – This is a timestamp of the last time this bridging instance generated RARP traffic.
- RARP Count – This lists the number of RARP packets that this bridge has transmitted.
Depicted above is an Edge Node VM hosting the ‘active‘ bridge instance for bridge ‘7608db2e-f2a9-49bc-98c8-b9e0a560c6e2‘. The bridge itself is bridging the ‘Web_Segment‘ logical switch with VLAN id ‘155‘. The data in ‘Event‘ tells us that this bridging instance became Active due to a ‘Forced Failover‘, which means that an HA change was induced by issuing the command ‘set bridge 7608db2e-f2a9-49bc-98c8-b9e0a560c6e2 state active‘.
If you want to get more historical data on high availability for a given bridge, you may do so with the command ‘get bridge <uuid> high-availability-history‘. This command provides HA state changes with timestamps along with some brief event data as to the reason for the change.

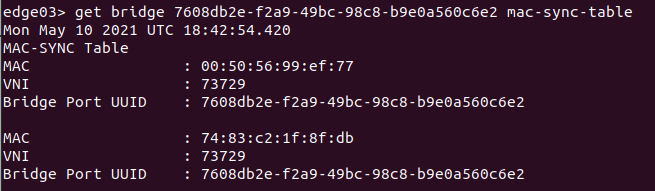
To obtain the VLAN MAC addresses learned by a bridging instance, you may issue ‘get bridge <uuid> mac-sync-table’ on the ‘active‘ or ‘standby‘ Edge Nodes that host the bridging instance. Remember: the ‘active‘ instance is continually syncing this learned data with the ‘standby‘. An example of this output is below:
NSX-T Bridge HA recap
We covered quite a bit up above, but the key takeaways are:
- NSX-T Edge bridge instances utilize RARP to notify both the physical switching environment and the NSX-T overlay segment that a HA change has occurred.
- You can verify bridge HA status, HA history, and learned VLAN MAC addresses via the Edge CLI.
Another great piece of data for NSX-T bridging may be found at the VMware communities website here. The document itself is regularly updated, and provides additional context to some of the topics we’ve been discussing.
Well, that’s it for now! See you in our next post!
